
Why You Need a WordPress Staging Site and How to Build It
A WordPress staging site is a separate, non-production version of your website where you can safely test changes before deploying them to the live site. It gives developers, site owners and content teams a controlled environment for updating WordPress core, plugins and themes, modifying code or design, testing integrations, and troubleshooting problems without disrupting visitors.
This guide explains why staging matters, the main ways to create a WordPress staging site, and how to test and deploy changes safely.
Why a WordPress staging site is important
WordPress changes rarely operate in isolation. A plugin update can conflict with a theme, a PHP upgrade can expose compatibility problems, and a design edit can affect templates elsewhere on the site.
With a WordPress staging site, teams can:
- Catch compatibility problems early: Test WordPress core, plugin, theme, PHP, and custom-code changes together before they can cause errors or broken layouts.
- Validate complete user journeys: Confirm that forms, search, navigation, authentication, e-commerce transactions, and third-party integrations still behave as expected.
- Review work collaboratively: Developers, marketers and stakeholders can inspect changes on a working site instead of relying on screenshots or unfinished production pages.
- Debug without disrupting visitors: Logs and debugging tools can be enabled away from the public site.
- Make releases repeatable: Teams can verify the exact set of changes being deployed and plan a rollback before production is affected.
That said, a staging site’s value depends on how closely it mirrors production and how thoroughly the team tests changes.
Key methods to create a WordPress staging site
You can create a WordPress staging site through your hosting platform, a staging plugin, a local development tool, or a manual server setup. Each method ultimately does the same basic job by creating a separate WordPress installation with its own URL, files and database. What differs is how closely that installation matches production, how much setup you must handle, and how safely changes can be transferred back. Though keep in mind that local development is often used alongside hosted staging rather than as a direct replacement.
Using your hosting provider
Host-provided staging creates an isolated copy of your WordPress site from the hosting dashboard, usually without requiring you to configure another server, database, or domain manually.
The main advantage is environment parity. Because staging runs on the same hosting platform as production, it is more likely to use comparable PHP versions, server configuration and platform services than a copy created elsewhere. Creating the staging environment and later refreshing it with current production data can also be faster, and the host may automate cloning, URL replacement, and other migration tasks that are easy to mishandle manually.
The limitation is that “push to production” is not automatically safe. WordPress stores posts, settings, users, orders, form submissions and many plugin configurations in its database. Replacing the live database with an older staging copy can erase activity added since the copy was made. Some providers allow selective deployment of files, folders or database tables, but that still requires knowing where each change is stored. The safer default is to pull current production data down for testing and deploy code upward, avoiding a full database push whenever possible.
Best suited for: Site owners, agencies and development teams that want the quickest repeatable workflow without maintaining separate infrastructure. For most managed WordPress sites, this is the best default – provided the team understands what gets copied, what is excluded and what a production deployment could overwrite.
Using a WordPress plugin
Plugin-based staging works in two different ways.
- Dedicated staging plugins such as WP STAGING and WPvivid can clone the live site directly from the WordPress dashboard. You choose a destination – often a subfolder such as example.com/staging – and the plugin copies the selected files and database tables, changes the necessary paths and creates another WordPress installation. Some paid versions can instead use a subdomain, separate database or external server.
- Backup and migration plugins use a more hands-on process. With Duplicator’s traditional workflow, for example, you package the live site, prepare another location and then upload and run the installer or import the package there. The destination could be a subdomain, another hosting account or a local environment. Duplicator Pro also offers a separate one-click option that automatically creates staging in a subfolder on the current server.
The main advantage is accessibility. You can create a staging environment even when your host does not provide one, often without manually exporting SQL, transferring files or editing configuration values. Depending on the tool and plan, you may also be able to choose which files or database tables to clone, refresh the copy and selectively push changes back to production.
The limitation is that this approach is not completely hands-off. A clone stored on the same hosting account shares its disk space and server limits with production, so cloning or testing a large site can place additional demand on that account. Free editions may support creating the staging copy but reserve subdomains, separate databases, remote hosting or push-to-live functionality for paid plans.
Deployment also requires care. Plugins cannot automatically determine whether a database table contains disposable staging settings or newer live orders, users and form submissions. Before syncing, confirm exactly which files and tables will be replaced, take a fresh production backup and avoid pushing the complete staging database over an active transactional site.
Best suited for: Smaller sites, freelancers and site owners whose hosting plan lacks built-in staging. It is also useful for temporary testing, but agencies and high-activity e-commerce or membership sites generally benefit from a platform-level workflow with stronger environment isolation and more controlled code deployment.
Using a local development environment
A local development environment runs WordPress on your own computer instead of a publicly accessible server. Tools such as Local, DDEV, Lando and WordPress’s wp-env package create the PHP, web server and database services WordPress needs, allowing you to build and test without changing the hosted site. An existing site can be copied locally by importing its files and database.
The main advantage is speed and control. Developers can edit files directly, use Git, run WP-CLI and Composer, enable debugging tools and switch software versions without consuming production resources. Container-based tools such as DDEV also let a team store environment configuration with the project, making it easier for developers to reproduce a consistent setup on different computers.
The limitation is that local development does not fully replace a hosted staging site. Your computer may use different PHP extensions, caching layers, server rules, networking and infrastructure from production. Local sites are also private by default, which makes them less convenient for stakeholder review and can complicate testing payment callbacks, webhooks, single sign-on and other services that must reach the site over the internet.
Another concern is production data. A local copy may contain customer accounts, orders or form submissions, so sensitive information should be removed or anonymized and the database should not be committed to a shared repository. Changes should normally be deployed as version-controlled code rather than by uploading an entire local database over production.
Best suited for: Developers building themes, plugins, blocks or substantial custom functionality that requires fast iteration and debugging. The strongest workflow uses local development for coding, then a production-like hosted staging environment for integration testing, stakeholder approval and final release checks.
Manually using the hosting control panel and server tools
Manual staging means building the environment yourself with a hosting control panel, SSH, SFTP, database tools and, ideally, WP-CLI.
The usual process involves:
- Creating a subdomain such as staging.example.com with its own document root.
- Copying the WordPress files.
- Creating and importing a separate database.
- Updating the copied wp-config.php with the staging database credentials.
- Replacing production URLs with the staging URL. For this, you might want to use a WordPress-aware tool such as WP-CLI’s wp search-replace, which will correctly process PHP serialized data. A basic SQL find-and-replace can corrupt serialized plugin, theme or widget settings.
The main advantage is control. You choose the server, software versions, database structure and access rules without relying on a staging plugin or proprietary host workflow. It can also reproduce production closely when both environments are configured on comparable infrastructure.
The limitations are time and risk. Incorrect paths, database credentials, permissions or URL replacements can produce broken links, redirect loops or connections to production services. The staging directory should be password-protected, and email, payment, analytics and scheduled-task behavior should be reviewed before testing. cPanel’s Directory Privacy feature can restrict the environment before WordPress loads.
Best suited for: Experienced developers, system administrators and teams that need complete infrastructure control. Host-provided staging is usually safer and easier to repeat.
How to set up a staging site on Pantheon
Pantheon treats staging as part of a structured deployment pipeline rather than an optional clone created only when a risky update is due.
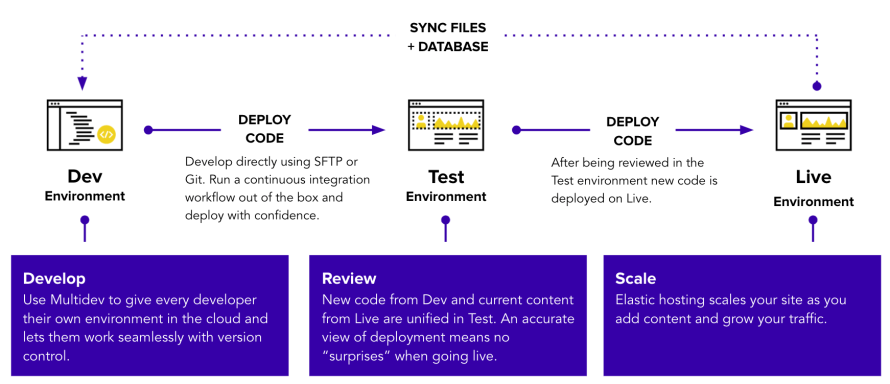
Every Pantheon site includes isolated Dev, Test, Live environments. Each runs independently, allowing teams to develop and validate changes without affecting the public website. Pantheon’s Test environment serves as the WordPress staging site.
Image
What makes Pantheon’s approach particularly reliable is the separation of code from content. Code moves forward through Dev, Test, Live, while the current database and uploaded files can be copied down from Live for testing. Teams can validate new code against recent production content without replacing the live database with an older staging copy.
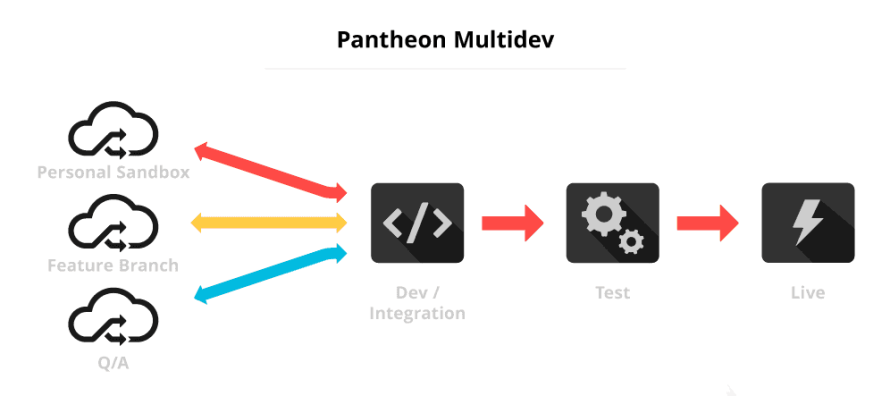
This model also gives teams more control over concurrent work. Pantheon’s Multidev feature creates branch-based development environments with their own code, database and files. Developers can isolate a redesign, plugin update or bug fix instead of competing for one shared staging copy, then merge approved code back into the main deployment pipeline.
Pantheon also provides environment-level backups containing the site’s code, database and files, giving teams restore points alongside the deployment workflow.
For professional WordPress teams, this is a stronger staging model than an ad hoc clone created only when something needs testing. The environments already exist, development is isolated from production, realistic content can move down safely and approved code follows the same repeatable path to Live. Staging becomes an enforceable part of how the site is operated rather than another temporary installation someone must remember to maintain.
Image
WordPress staging best practices
A staging site is only useful when it resembles production closely enough to expose real problems without triggering real-world consequences. Follow these practices to keep testing accurate and safe:
- Refresh the staging before significant testing: Copy recent production content into staging so new code is tested against current posts, media, settings and data structures. Remember that refreshing normally overwrites the existing staging database and files, so preserve any unfinished work first.
- Restrict access and block indexing: Use authentication or password protection when staging contains private or customer data. Add noindex as an additional SEO safeguard, but do not rely on robots.txt alone because blocked URLs can still appear in search results.
- Identify the environment in WordPress: Set WP_ENVIRONMENT_TYPE to staging so WordPress and compatible plugins can apply environment-specific behavior instead of treating the site as production.
- Neutralize production integrations: Use payment sandboxes, suppress customer emails and review copied webhooks, analytics, CRM connections and scheduled processes. A cloned webhook can otherwise continue sending staging events to a production service.
- Test complete journeys, not isolated pages: Check authentication, forms, search, responsive layouts, accessibility and, where relevant, checkout, refunds and subscription behavior.
- Keep code and content moving in predictable directions: Promote version-controlled code toward production and refresh content downward from Live. Avoid routinely pushing a complete staging database over an active site because that can erase newer orders, users, posts or configuration.
How to deploy staging changes to production safely
A safe staging-to-production deployment promotes the tested change without replacing content that has been created on the live site since staging was refreshed. Here’s how to achieve this:
- Confirm exactly what will move: Themes, custom plugins and other code should be tracked in version control and deployed as the same tested revision. Avoid recreating changes manually in production because the live result may differ from the version that passed staging.
- Do not push the entire staging database by default: WordPress stores posts, settings, users, orders and form entries in the database. Replacing Live with an older staging database can erase newer activity. That’s why in Pantheon’s workflow code moves from Dev to Test to Live, while production content moves down into testing environments.
- Create a fresh production backup: Back up the database and files immediately before deployment, and confirm that the team knows how to restore them. WordPress requires both components for a complete recovery.
- Run a final release check: Verify that the approved code is still running against recent production content, then retest the highest-risk journeys, including forms, login, search and checkout.
- Check production immediately afterward: Confirm that the release completed successfully, clear relevant caches and test critical functionality on the live domain. Watch application logs and error monitoring for problems that were not reproducible on staging.
If an issue appears, revert the deployment rather than making rushed, untracked fixes directly in production. Undo the most recent commit or deployment before attempting a full environment restore.
Choose the right staging workflow
The right WordPress staging setup is the one your team can use consistently without risking live content. Local environments are ideal for development, plugins can fill gaps when hosting lacks staging and manual setups provide maximum control. For most professional teams, however, host-provided staging offers the strongest balance of accessibility, isolation and repeatability.
Pantheon goes further by making staging part of the platform’s core workflow. Dev, Test, Live are already separated, production content can be copied down for realistic testing and approved code follows a controlled path toward release. That reduces the temptation to edit production directly or overwrite an active database with an outdated staging copy.
Pantheon strengthens that workflow further with:
- Git-based version control to keep code changes stored, traceable and deployable as a tested revision.
- Quicksilver platform hooks for automating deployment-related tasks such as team notifications, database sanitization and additional testing.
- Autopilot with visual regression testing to test WordPress updates in an isolated Multidev environment and detect unexpected visual changes before deployment.
Do not wait for the next risky update or major launch to build a safer process. Start with Pantheon today and give every WordPress change a clear path from development to testing to production!
FAQs
What's the difference between staging and local development?
A local development site runs on a developer’s computer and is primarily used for writing code, debugging and rapid experimentation. A staging site runs on hosted infrastructure and is usually accessible to authorized teammates, clients and external services.
Local development offers greater speed and control, but staging is generally better for final integration testing because it can more closely match production infrastructure. A strong workflow uses local development to build changes and staging to validate them before release.
For those using Pantheon, Lando’s Pantheon recipe can create a local environment that closely resembles Pantheon’s technology stack, install Terminus and move code and site data between the local installation and Pantheon environments.
Is staging the same as a backup?
No. A staging site is an active environment where changes are developed, tested and reviewed. A backup is a stored copy of the site’s database, uploaded files and, depending on the backup system, code that can be restored after data loss or a failed deployment.
Because staging is frequently changed and may not contain the latest production content, it should never be treated as a replacement for reliable backups.
Can staging affect SEO?
Yes, a publicly accessible staging site can be crawled and indexed, creating duplicate versions of production pages or exposing unfinished content.
The strongest protection is to restrict the entire environment with authentication. A noindex directive provides an additional safeguard, but robots.txt alone is not enough because blocking crawling does not necessarily prevent a URL from appearing in search results.
On Pantheon, teams can lock individual environments with a username and password through the Site Dashboard.
How often should staging be refreshed?
There is no universal schedule. Refresh staging before major updates, releases or testing cycles whenever its content and configuration have drifted far enough from production to make the results unreliable. High-activity e-commerce, membership and publishing sites may need fresher data than relatively static brochure sites.
How do I access my staging site without accidentally editing the live site?
Use clearly different URLs, browser bookmarks and visual environment indicators. Confirm the domain before logging in or making changes, and avoid keeping production and staging dashboards open in similar-looking browser tabs.
WordPress supports local, development, staging and production environment types through WP_ENVIRONMENT_TYPE, which plugins and custom code can use to apply environment-specific behavior. Pantheon’s HUD plugin displays the current environment in the WordPress admin bar.
Restricting staging with a separate username and password provides another obvious checkpoint before entry.