Custom Taxonomies for WordPress Development
As a WordPress developer, you’re probably no stranger to WordPress’s power and flexibility to create websites. But when it comes to organizing content in a more structured, meaningful way, WordPress taxonomies are just what you need to elevate your site to new levels. Whether you’re building a blog, e-commerce platform or custom content types, taxonomies allow you to categorize, filter and display your content efficiently.
Let’s dive into the world of custom taxonomies for WordPress development, explore how they work and show you how to harness their full potential, so you can craft better-organized, user-friendly websites.
What is a WordPress taxonomy?
In WordPress, a taxonomy is a way to group content together based on shared characteristics. Imagine taxonomies as a classification system, similar to how books in a library are sorted by genre, subject or author.
WordPress offers two default taxonomies – Categories and Tags (which we’ll get into later) – but taxonomies are much more than just these built-in tools. A taxonomy can be any system of classification, and WordPress allows developers to create custom ones that perfectly suit the site's needs
For example, if you're building a site for a movie database, you might create a custom taxonomy called “Genres” or “Directors.” This lets you organize your content (in this case, movies) into more meaningful and specific groups. Custom taxonomies add incredible flexibility to WordPress, allowing you to create the right structure for your unique content.
With the right taxonomies in place, users can easily navigate your site, find related content and ultimately have a better experience.
Types of WordPress taxonomy
Default taxonomies
Categories are hierarchical taxonomies, meaning they can have parent and child categories. This makes them perfect for broad groupings like “News," “Events” or “Products.” They are often used to organize content in a more structured, large-scale way. For instance, a blog might have categories like “Tech," “Health” and “Lifestyle.”
Tags are non-hierarchical taxonomies used for more specific, detailed grouping. They allow you to associate a post with particular topics or keywords, such as "WordPress Tips," "SEO" or “Theme Design." While categories provide a broader structure, tags give users an easy way to explore related content.
Custom taxonomies
While the default categories and tags are useful for many sites, custom taxonomies unlock a world of possibilities. They let you define your own classification system tailored to your site’s content, whether hierarchical (like categories) or non-hierarchical (like tags).
For example:
- Hierarchical taxonomy – If categorizing books, you might have "Fiction" as a parent term with "Science Fiction," "Mystery," and "Romance" as children.
- Non-hierarchical taxonomy – You might create flat tags like #BreakingNews, #ExpertAnalysis, #OpinionPiece for your news platform.
By adding custom taxonomies, you can create a more granular, purposeful content structure. This improves organization and enhances user navigation and search functionality.
How to create custom taxonomies
Creating custom taxonomies in WordPress is relatively straightforward and can be done in two main ways: using plugins or adding code directly to your child theme’s functions.php file.
Method 1: Using plugins
For those who prefer a simple, user-friendly approach, plugins like Advanced Custom Fields (ACF) and Custom Post Type UI are a great solution. With these plugins, you can create custom taxonomies without writing any code. They provide an intuitive interface where you can set the taxonomy’s name, slug and hierarchical structure and even associate it with custom post types.
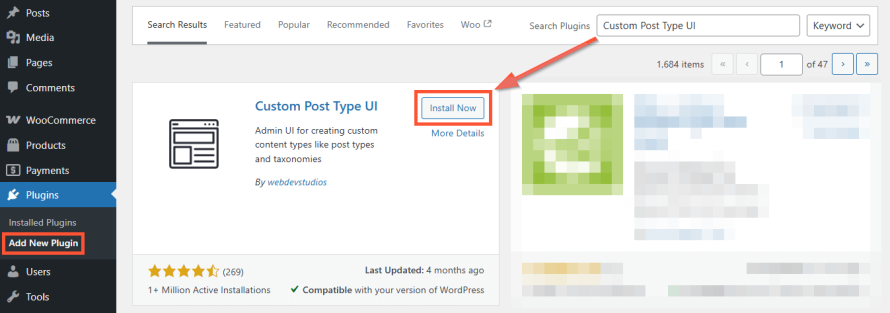
Here’s a quick look at how you would use a plugin like CPT UI:
1. Install and activate the plugin from the WordPress repository.
Image
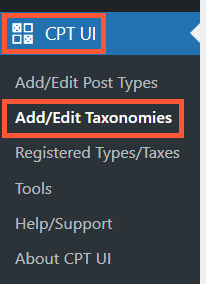
2. Navigate to the Custom Post Type UI menu in your WordPress dashboard and select the option to add a new taxonomy.
Image
3. Define the taxonomy’s settings, such as its name, slug and whether it’s hierarchical (like categories) or non-hierarchical (like tags).
4. Associate the taxonomy with your desired post types (e.g., Pages, Posts or Custom Post Types).
5. Save your settings and the new custom taxonomy will be ready to use on your site.
This method is ideal for those who want to avoid touching code and prefer an interface-driven approach. Plus, it ensures you don’t make any mistakes or typos when registering taxonomies.
Method 2: Adding code to your child theme’s functions.php
For developers who want complete control and prefer to add a bit of custom code, registering a custom taxonomy manually through the functions.php file is a solid option. This approach provides flexibility and a deeper understanding of how taxonomies work within WordPress.
Open your child theme’s functions.php file (located in your theme directory) and add the following code:
function custom_taxonomy() {
// Set up labels
$labels = array(
'name' => 'Genres',
'singular_name' => 'Genre',
'search_items' => 'Search Genres',
'all_items' => 'All Genres',
'parent_item' => 'Parent Genre',
'parent_item_colon' => 'Parent Genre:',
'edit_item' => 'Edit Genre',
'update_item' => 'Update Genre',
'add_new_item' => 'Add New Genre',
'new_item_name' => 'New Genre Name',
'menu_name' => 'Genres',
);
// Set up arguments
$args = array(
'hierarchical' => true, // Set true for a category-like taxonomy
'labels' => $labels,
'show_ui' => true,
'show_admin_column' => true,
'query_var' => true,
'rewrite' => array('slug' => 'genre'),
);
// Register the taxonomy
register_taxonomy('genre', array('post'), $args);
}
add_action('init', 'custom_taxonomy');
This example registers a custom taxonomy called “Genres” for the “Post” content type.
Image
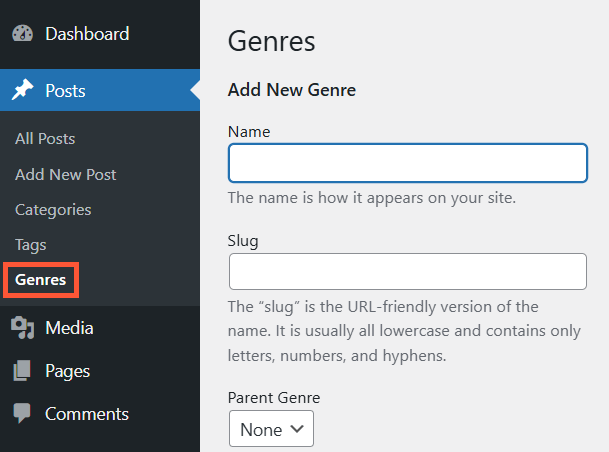
You can customize the labels and settings to fit your needs. The hierarchical parameter determines whether your taxonomy behaves like categories (true) or tags (false).
Save the file and the taxonomy will be registered!
Both methods achieve the same goal, so it comes down to your comfort level and project requirements. Regardless of which route you choose, custom taxonomies can dramatically enhance the organization and discoverability of your content.
How to create taxonomy template files
Once you’ve set up custom taxonomies, the next step is to customize the way they appear on your site. WordPress allows you to create taxonomy template files that dictate how your custom taxonomy terms are displayed. This gives you the power to design beautiful, dynamic pages for each taxonomy and term.
WordPress follows a specific template hierarchy to determine which template file should be used for displaying taxonomies. When you create custom taxonomies, you can override these default templates to match the design and functionality you want. Here's how it works:
- taxonomy-{taxonomy}.php: The most specific template. For example, if you created a custom taxonomy called “genre," the template file would be taxonomy-genre.php. This file will handle all the front-end display for the “genre” taxonomy terms.
- taxonomy.php: If no specific template exists for your taxonomy, WordPress will fall back to this template to display your terms.
- archive.php: In the absence of both taxonomy-{taxonomy}.php and taxonomy.php, WordPress will use the generic archive.php template.
Now that you understand the template hierarchy, let’s go over how to create and customize your taxonomy template files.
Note: The steps below are not compatible with Block Themes that use Full Site Editing.
Step 1: Create the template file
We’ve just created a custom taxonomy called “Genres." The first thing you’ll want to do is create a file named taxonomy-genre.php in your theme’s root directory. This file will be responsible for displaying the “Genres” taxonomy and all its terms.
Step 2: Customize the template
Inside taxonomy-genre.php, you’ll write the PHP and HTML necessary to display your taxonomy terms. Here's a basic example:
<?php get_header(); ?>
<div class="taxonomy-genre-page">
<h1>Genres</h1>
<?php
if ( have_posts() ) :
echo '<ul>';
while ( have_posts() ) : the_post();
?>
<li><a href="<?php the_permalink(); ?>"><?php the_title(); ?></a></li>
<?php
endwhile;
echo '</ul>';
else :
echo '<p>No posts found in this genre.</p>';
endif;
?>
</div>
<?php get_footer(); ?>
In this example, the template retrieves and displays posts associated with the "Genres" taxonomy. The posts are listed in an unordered list, with links to the individual post pages.
Step 3: Style the template
The front-end design of your taxonomy page is just as important as its functionality. You can use CSS or a theme builder to style the list of terms, individual term pages or category navigation. For example, you might want to style the genres with a specific layout or add custom branding elements to the page.
Step 4: Test the template
Once you’ve written and styled your template, make sure to test it by visiting a term page in your custom taxonomy. For instance, if you’re using the "Genres" taxonomy, go to a page that displays posts under a specific genre, like /genre/action/. Check if the template is rendering correctly and that the content is displayed as you intended.
Important: WordPress might not recognize the new custom taxonomy's URL structure right away. To fix this, you'll need to flush the rewrite rules:
- Go to Settings > Permalinks in your WordPress dashboard.
- Simply click Save Changes without making any modifications.
This will refresh WordPress's permalink structure and should help it recognize the correct URLs for your custom taxonomy.
Advanced template customizations
You’re not limited to just displaying a list of posts when customizing taxonomy templates. Here are a few advanced ideas:
- Custom taxonomy archives: Create custom layouts or grids for taxonomy term archives, similar to a portfolio or product catalog.
- Custom fields and metadata: If your taxonomy terms contain additional information (like custom fields), you can display that metadata on the term pages.
- Filters and pagination: Add custom filters to allow users to sort or filter posts within a taxonomy term, enhancing user navigation.
Streamline your workflows on Pantheon
Now that you’ve mastered creating custom taxonomies and customizing taxonomy templates, it’s time to take your development process to the next level with Pantheon. As a developer-focused platform, Pantheon offers the tools and infrastructure to accelerate your WordPress projects and optimize your workflow.
With Pantheon’s powerful Git-based workflow and Dev, Test, Live environments, you can build, test and deploy your custom taxonomies with confidence, knowing that your site’s performance and scalability are in safe hands. Pantheon’s reliable infrastructure and global content delivery network (CDN) ensure your custom taxonomy pages load fast, even as your site grows.
If you're looking to simplify the process, ensure fast deployment and keep your workflows streamlined, Pantheon is the solution you’ve been searching for.
Start with Pantheon today and experience the difference of a platform built for developers who want more control, faster deployment and easier management!