Fast-Loading WordPress PWAs for High-Traffic Sites
Image
WordPress has made measurable performance gains in the past couple of years: faster block rendering, smarter image processing, leaner JavaScript. But if you're managing a high-traffic site with a large audience of mobile users, those gains are only part of the equation.
Mobile users expect near-instant load times. In fact, Google data shows that as page load time increases from 1 second to 3 seconds, the probability of a mobile visitor bouncing rises by 32%. If loading stretches to 10 seconds, bounce rates spike by 123%.
While you might not have control over your users’ devices or network speeds, you do have control over how your site behaves in less-than-ideal conditions. That’s where progressive web apps (PWAs) enter the picture.
For WordPress sites running at scale, adding Progressive Web App (PWA) capabilities means going beyond traditional caching and asset optimization. It means providing users with a faster, more resilient experience with offline access, installable interfaces and background syncing – all using open web standards.
If you're running WordPress on Pantheon, you're already starting with a modern, containerized infrastructure built for performance. Layering PWA functionality on top of that opens the door to a significantly better mobile experience
So, without further ado, let’s get into what PWAs are, why they matter for WordPress at scale and how to build one (from scratch or using a plugin) that meets Google’s standards.
What are progressive web apps (and why transform your WordPress site into one)?
PWAs are web applications that use modern browser features to deliver fast, reliable and engaging user experiences, especially on mobile devices.
Traditionally, mobile websites and native apps lived in separate silos. PWAs blur that line. They’re built using standard web technologies like HTML, CSS and JavaScript, but with capabilities that make them feel and function more like native apps. That means you don’t have to build and maintain separate applications specifically for iOS or Android, for example.
With PWAs, you get:
- Offline support via service workers, so users can browse previously visited pages without connectivity.
- Push notifications that let you re-engage users – no third-party ad platform required.
- Home screen installation so your site can be launched like a native app.
- App-like speed thanks to smart caching and background resource loading.
By caching key resources and preloading content, a well-built PWA often loads faster than a traditional mobile site on the same infrastructure. For users on unreliable networks or devices with limited power, that difference is noticeable. This makes them a compelling option for high-traffic publishers, e-commerce stores and content platforms that want to improve mobile UX without reinventing their stack.
Not to mention, PWAs bypass app stores entirely. There’s no need to go through lengthy approval processes or force users to download updates. Every time you deploy a change to your WordPress site, it can go live instantly, just like the web is supposed to work.
That’s why PWAs are especially beneficial for medium to large-sized sites that rely heavily on mobile traffic, such as e-commerce platforms, news outlets and content-heavy sites. These types of websites can take advantage of PWAs to enhance user engagement and improve performance, particularly in regions with spotty internet connections.
However, PWAs may not be the best fit for smaller, less complex sites or those that don’t have a significant mobile audience. For websites with limited functionality or a small user base, the time and resources required for development may outweigh the potential benefits.
Meeting Google’s PWA standards
Google is the primary architect of PWAs, having introduced the concept, developed the core technologies and created the tools that developers now depend on. That’s why it’s detrimental to meet Google’s expectations.
Fundamentally, Google highlights three essential components that every functional PWA relies on: a web app manifest JSON file, a service worker and an HTTPS connection.
Let’s take a closer look and Google’s defined standards for these PWA building blocks and beyond:
Web app manifest
The web app manifest is a JSON file required by Google for every PWA that defines how your PWA appears and behaves when “installed” on a device, like a native app. Google set the standard structure for this file to ensure a consistent, app-like experience across platforms. At a minimum, your manifest should include:
- name and short_name: The full and abbreviated names of your app.
- start_url: The page the app should load on launch.
- icons: At least two sizes: 192x192 and 512x512 pixels, in PNG format, for cross-device compatibility.
- display: Defines how the app is presented. Google prefers standalone or full-screen for an app-like feel.
- theme_color and background_color: Used to style the browser UI and splash screen.
- orientation: Optional but useful to lock the app to portrait or landscape mode.
Once created, the manifest must be correctly linked in your site’s <head> using a <link rel="manifest"> tag. Missing or misconfigured fields can prevent your PWA from passing Google's installability checks in Lighthouse (which we’ll get into later).
Service workers
A service worker is a JavaScript file that runs in the background and enables advanced capabilities like offline access, caching and push notifications. Google authored the original specification and continues to define how service workers should behave to meet PWA criteria.
The key expectations for service workers include:
- HTTPS requirement: Service workers only work on secure (HTTPS) origins. This is a mandatory security measure.
- Precise caching strategy: Google recommends using the Workbox library to implement smart caching strategies like:
- Cache-first for static assets.
- Network-first for dynamic content.
- Background sync to replay failed requests when back online.
- Push notifications and background sync: These features must be properly registered and permission-controlled to align with Google's guidelines for user experience and security
- Efficient registration: Service workers should be registered via JavaScript in your theme or plugin files using navigator.serviceWorker.register().
As you can see, service workers are powerful, but complex. Don’t worry, though – we’re going to walk you through all these steps in the coming sections.
Core web vitals
Performance is a top priority for Google and it's tightly linked to SEO and user experience. That’s why PWAs must meet core web vitals, which are a set of key metrics Google uses to evaluate real-world performance:
- Largest contentful paint (LCP), which measures loading speed, should be under 2.5 seconds.
- First input delay (FID), which measures responsiveness, should be under 100 milliseconds
- Cumulative layout shift (CLS), which measures visual stability, should score under 0.1.
Failing these benchmarks can hurt your SEO rankings and cause your PWA to be flagged in Google’s Lighthouse audits.
Google's toolkit for developers
To meet and validate all of the above standards, Google provides powerful tools that you can use in the WordPress ecosystem like:
- Lighthouse (built into Chrome DevTools), which should be your go-to audit tool for checking PWA compliance, performance, accessibility and SEO.
- Application panel in DevTools, which will let you inspect and debug service workers, manifest files and PWA installability.
Additionally, Google strongly encourages testing on multiple devices and under real-world conditions, including offline mode and slow network simulations.
Use these tools early and often during development.
Requirements for WordPress PWA development
Whether you're using a plugin or going fully custom, PWAs require a thoughtful setup that brings together WordPress’s flexibility and modern web technologies. Your WordPress environment must meet these minimum requirements:
- HTTPS is mandatory – we can’t stress this enough. If you’re using Pantheon, you automatically get free TLS certificates via Let’s Encrypt for every custom domain you add, with no manual steps required.
- The latest versions of WordPress and PHP.
- Custom permalinks enabled.
- A WordPress theme that’s responsive and mobile-friendly (most modern themes are, so this shouldn’t be a problem). It also needs to support wp_head() and wp_footer() functions.
For most organizations, plugins strike the right balance between speed of implementation and feature coverage. They allow you to meet Google’s PWA standards without having to manually configure service workers, caching strategies or manifests from the ground up.
However, some organizations choose to build PWAs from scratch because it gives them unparalleled flexibility, despite requiring more development time and testing. The ability to fine-tune caching rules, offline behavior and device-specific experiences can be worth the investment for high-traffic, mission-critical sites.
That being said, to be able to build or customize a WordPress PWA from manually, you should be comfortable with:
- HTML and CSS – for layout and responsive design.
- JavaScript – for service workers, interactivity and caching logic.
- PHP – to customize WordPress themes and plugins.
- UX design principles – to build mobile-first, intuitive interfaces.
Now let’s get hands-on.
Creating a custom WordPress PWA from scratch
Step 1: Create the web app manifest
Like we explained before, the web app manifest is a JSON file that provides metadata about your site/application to the browser. It’s what enables the “Add to Home Screen” prompt and defines how your site appears when installed on a user’s device.
Using a text editor or a coding IDE such as VSCode or PHPStorm, create a file named manifest.json (the name is conventional) in the root of your WordPress site (e.g., alongside wp-config.php). You can opt to add it to your active WordPress child theme folder instead.
Inside this file, add JSON all the essential info we explained earlier:
- The full marketing name of the app.
- A shorter (short_name) that fits under a home-screen icon,
- A description.
- Where the app should start (start_url) when it opens and how wide its reach or scope should be. Most sites keep this at “/” so the PWA can control every page.
- A color (theme_color) that tints the status bar or browser UI.
- A background color (background_color) for the splash screen.
- An icons array (icons), usually a 192 × 192 px PNG for the install banner and a 512 × 512 px PNG for high-resolution contexts, plus any extra sizes or an “any maskable” icon so devices can crop it into adaptive shapes.
Here’s an example manifest:
{
"name": "My WordPress PWA",
"short_name": "WP PWA",
"start_url": "/",
"display": "standalone",
"background_color": "#ffffff",
"theme_color": "#0073aa",
"icons": [
{
"src": "/wp-content/uploads/icon-192.png",
"sizes": "192x192",
"type": "image/png"
},
{
"src": "/wp-content/uploads/icon-512.png",
"sizes": "512x512",
"type": "image/png"
}
]
}
Ensure the paths are correct (the example assumes you uploaded icons to the Media Library and know their URLs or placed them in wp-content/uploads).
Step 2: Link to the manifest file
You need to link the manifest file to your site’s <head> section using a <link rel="manifest"> tag so browsers know where to find it. The browser won’t know your PWA even exists unless you do this.
You can do this by creating a PHP function in your child theme’s functions.php file to insert the manifest link automatically on every page. Here’s an example:
function add_pwa_manifest() {
echo '<link rel="manifest" href="/manifest.json">';
}
add_action('wp_head', 'add_pwa_manifest');
This tells WordPress when it’s building the <head> section of every page to run this function, too. So whenever a user visits your site, WordPress will include this in the <head>:
<link rel="manifest" href="/manifest.json">
You can verify the manifest is working by opening your site in Chrome and using DevTools. Go to the Application tab and click Manifest in the sidebar. You should see your app name, icon, theme color and other details listed if your manifest is successfully linked.
Step 3: Implement the service worker
The service worker runs in the background, separate from your web pages. It acts as a network proxy, intercepting requests and responding to them from the network, from the cache or from both (depending on the strategy you define).
In your text editor, create a file named service-worker.js (you can name it differently, but this is common). By default, the service worker’s scope (what URLs it can control) is limited to the directory it’s in and below. Placing it in the root of your WordPress install allows it to control the entire site.
Here’s the logic you need to implement in your service-worker.js:
Declare a unique cache name
The service worker should start by defining a name for the cache it’s going to use. This is essential because it lets the browser identify and manage what gets stored for offline use. Giving your cache a versioned name (like v1, v2, etc.) also allows you to update your files in the future without conflicts. It's your way of organizing and controlling cached resources over time.
Define which files to cache
Specify a list of important assets to store in the cache. This usually includes your homepage, stylesheets, JavaScript files, app icons and any other resources that are critical to the layout and core functionality of the site. This list creates what’s called the “app shell”, which is the bare minimum needed to load a usable version of your site, even when the user is offline.
On the install event, cache the app shell
When a user first visits your site and the service worker is installed, it should run an “install” event. During this event, the service worker opens the browser cache and stores all the assets you defined earlier.
This way, you're making sure all the essentials are preloaded, so your site can load instantly the next time it’s opened, regardless of network status. This step is crucial for offline support. Without it, the browser won’t know what to serve when there's no internet connection.
On the fetch event, serve cached content or go online
After installation, every time the browser tries to load a resource (like a page, image or file), the service worker runs a “fetch” event. This is the logic that intercepts those requests and decides how to respond.
It should:
- First, check if the requested file is already in the cache.
- If it is, serve the cached version (this makes your site faster and usable offline).
- If it isn’t, fetch it from the live internet (so you still get fresh content when online).
This creates a cache-first strategy, which is the simplest and most reliable approach for static files like your theme’s CSS or logo images.
Handle different resource types with smart strategies
To make your PWA more efficient, you can apply different caching strategies based on what kind of file is being requested. For example:
- Use cache-first for images and static files, because these rarely change.
- Use network-first for dynamic content, like blog posts or API data, to make sure users always see the most recent information.
- Optionally, use “stale-while-revalidate” for a balance: show the cached version first, but update it in the background if newer content is available.
Define fallbacks and handle errors
A good service worker also handles edge cases, like what happens if both the cache and the network fail. In those cases, you can define a fallback response, such as an “offline” page or a default error message. This ensures users aren’t just left with a broken screen.
Cache versioning and updating
When you update your site (e.g., change a CSS file), you don’t want the browser to keep using an old, cached version. That’s why service workers should also handle cache versioning. This usually involves comparing the current cache name to an old one, deleting the outdated files and caching the new versions during an “activate” event.
Step 4: Register the service worker
The service worker doesn’t automatically work by just existing in the background. It must first be registered with the browser via JavaScript code.
The registration code should be added to a place that runs on every page load, so add it to footer.php or enqueue it in your theme.
Here’s an example script:
if ('serviceWorker' in navigator) {
navigator.serviceWorker.register('/service-worker.js')
.then(registration => {
console.log('Service Worker registered:', registration.scope);
})
.catch(error => {
console.log('Service Worker registration failed:', error);
});
}
Let’s break it down:
- The first line checks if the user's browser supports service workers using the navigator.serviceWorker API.
- The navigator.serviceWorker.register JavaScript built-in method registers the service worker.
- If the registration is successful, it logs a confirmation message and gives you access to the registration object (which holds useful details like the scope of the service worker and whether it was activated).
- The .catch() block ensures that if something goes wrong, you have a clear message in the console, making it easier to troubleshoot.
Step 5: Implement the app shell architecture
The app shell is the minimal layout of your site that loads instantly and is cached by the service worker.
Develop a minimal HTML/CSS/JavaScript shell containing a navigation header, basic layout structure, loading indicators and core JavaScript functionality.
The shell should load instantly from cache while dynamic content populates via API calls.
And that’s it! You now have a solid foundation to add on to for your WordPress PWA. For example, you can take it a step further and add push notifications to re-engage users and provide real-time updates.
Oh and don’t forget to always test along the way.
Building a PWA with WordPress plugins: Complete walkthrough
If building a PWA from scratch feels like too much overhead or if you’re looking for a faster path to implementation, there are several well-maintained WordPress plugins that handle most of the heavy lifting for you:
- SuperPWA allows you to convert your WordPress site into a PWA instantly with no coding required. It provides a user-friendly setup with essential PWA features like offline support, customizable icons and the "Add to Home Screen" prompt.
- PWA for WP offers a comprehensive PWA solution with full AMP compatibility for optimized performance. It provides service worker integration, offline capabilities and customizable app icons, splash screens and full-screen displays.
- PWA focuses on providing a shared foundation for integrating progressive web app features with your existing WordPress theme and plugins. It ensures compatibility, centralizes service worker management and prevents conflicts. It allows other PWA-related features (like push notifications or theme-specific caching) to integrate smoothly without issues.
For this tutorial, we’ll be using SuperPWA:
1. Install and activate the plugin on your WordPress site.
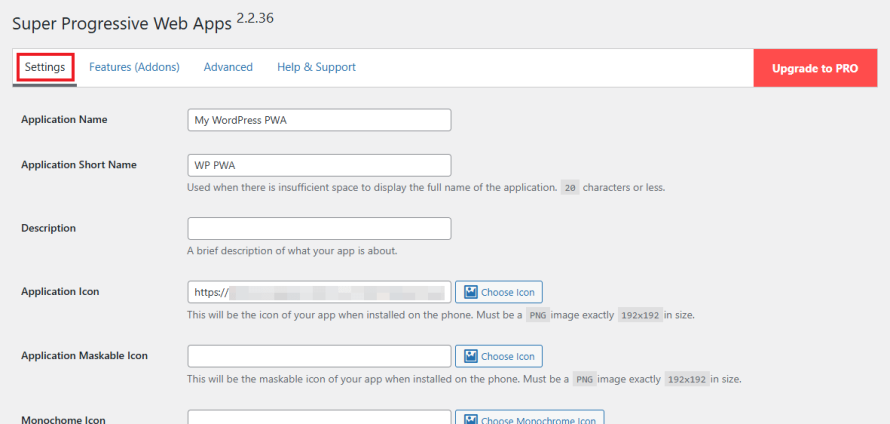
2. From the WordPress admin sidebar, go to SuperPWA > Settings.
3. Fill in the fields, set up icons and configure the background color.
Image
4. For the Offline Page option, pick an already existing page or create a new one from Pages > Add Page in your WordPress admin.
5. Go to the Advanced tab in SuperPWA and configure the offline message.
Image

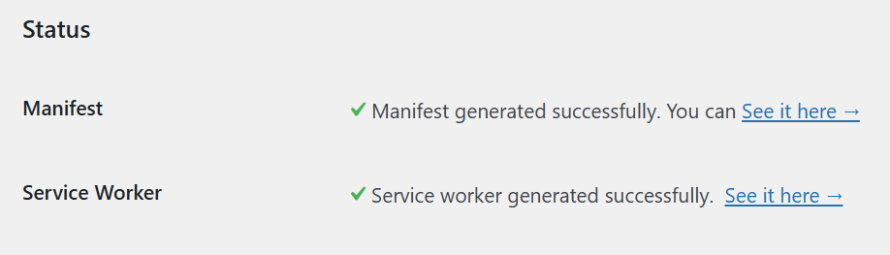
6. Click Save Settings. The manifest JSON and service work files will be generated by the plugin. You can view them in the Settings tab, under the Status section.
Image
If you want to configure more advanced features, you can always use the paid version of SuperPWA.
And, like the pluginless approach, don’t forget to test to make sure everything is set up correctly and works smoothly.
Common PWA challenges (+ their solutions)
Service worker lifecycle bugs
The service worker lifecycle, especially updates, can lead to frustrating bugs. Developers often run into situations where changes aren’t reflected because the old service worker is still controlling the page or users get stuck with stale data.
To tackle this, use skipWaiting() and clients.claim() wisely and notify users when a new version is available so they can refresh. You can even build a “new version available” snackbar or toast to prompt the user to reload after updates.
Also, implement versioning in your cached assets and always test lifecycle events during staging deploys.
Offline functionality doesn’t always work
Despite advances in service workers, building truly reliable offline experiences is still tricky. Unexpected caching behavior, failed syncs or inconsistent fallback pages often trip up even experienced devs.
The solution is to:
- Start with a tried-and-true library like Workbox to simplify service worker setup.
- Always test in multiple environments (including offline mode) before going live.
- Not rely solely on defaults – customize your caching logic and always include graceful fallbacks (like an offline page or saved content).
Cross-browser compatibility remains a moving target
PWAs behave differently across browsers – and yes, Safari still handles things its own way. Features like installation prompts, push notifications or even basic caching can vary.
That’s why you should design for progressive enhancement. Use feature detection instead of browser detection and always offer an alternative path if a feature isn’t supported. Maintain a regularly updated browser support matrix and test your PWA on real devices.
SEO and discoverability
PWAs that rely heavily on JavaScript can confuse search engines, making SEO a constant concern. If your app shell loads but content doesn’t render correctly for crawlers, you lose visibility.
Try using server-side rendering (SSR) or prerendering for critical routes. Make sure your routing is crawlable, metadata is consistent and structured data is correctly implemented. Also, don’t forget the basics – XML sitemaps, canonical tags and semantic HTML still matter.
How Pantheon supercharges WordPress PWA performance
While WordPress and PWAs can be powerful together, the infrastructure underneath plays a major role in how well everything performs, especially at scale.
Here’s how Pantheon helps you get the most out of your WordPress PWA:
- Built for scale: Pantheon’s container-based infrastructure is designed to absorb massive traffic spikes without slowing down. That means your PWA can continue delivering cached content instantly, while the backend scales automatically to serve fresh content or handle background sync operations.
- Global CDN (content delivery network) for edge-level caching: Pantheon’s integrated Global CDN ensures that static assets (like JavaScript bundles, service worker files and images) are served from edge locations around the world. This reduces latency dramatically for mobile users, which is especially important for PWAs that rely on fast repeat visits and asset delivery.
- Dev, Test, Live environments: With Pantheon’s structured Dev, Test, Live workflow, you can:
- Experiment with caching strategies or manifest changes in Dev.
- Validate functionality and Lighthouse scores in Test.
- Deploy safely to Live without risking user-facing errors.
- New Relic monitoring built in: Every Pantheon site includes New Relic APM access, so you can track server-side performance, including how your PWA interacts with WordPress under real traffic.
With Pantheon as your host, rest assured your PWA will be performing at its absolute best!
Transform your WordPress site into a performance powerhouse
At the end of the day, users just want a site that loads fast and feels effortless to use, especially on mobile. Implementing a PWA is an excellent way to meet these modern expectations.
And when you build on Pantheon, you don’t have to worry about performance bottlenecks or scaling issues. With our high-speed infrastructure, global CDN and built-in developer tools, you’re already set up for success. Adding PWA functionality is just the next step in unlocking your site’s full potential.
Want to build a blazing-fast WordPress experience your users will love?
Get started with Pantheon today and enjoy a faster, more reliable WordPress site!