How to Use WooCommerce Webhooks for Custom Development
Efficiency and automation are the hallmarks of running successful e-commerce. As your WooCommerce store grows, managing the data flow between different systems becomes increasingly challenging – especially if you're working with third-party services or custom integrations. These could be anything from payment processors like Stripe or PayPal, shipping platforms like ShipStation, inventory management tools, customer relationship management (CRM) software like HubSpot, or even custom applications unique to your business.
For example, how does your shipping software know when an order is placed? Or how does your CRM automatically track customer purchases for targeted marketing? This is where webhooks step in as the vital connectors. Instead of requiring manual data entry or repetitive API polling (where systems repeatedly ask for updates), webhooks allow for instantaneous, automated updates. They ensure that all your systems work harmoniously, no matter how complex your tech stack becomes.
In this guide, we’ll dive deep into everything you need to know about WooCommerce webhooks. We’ll cover their benefits, setup, and customization and explore critical topics like security best practices and troubleshooting!
Benefits of using webhooks in WooCommerce
Webhooks are all about simplifying your operations and enhancing your store’s capabilities. By enabling real-time communication between your WooCommerce store and other systems, webhooks can take your business automation to the next level with:
1. Automation & Efficiency
• Instantly notify shipping platforms of new orders.
• Update inventory across all sales channels automatically.
• Sync customer data with your CRM in real time.
• Eliminate manual data entry and human error.
2. Integration & Flexibility
• Connect seamlessly with payment gateways.
• Integrate with shipping providers and ERP systems.
• Build custom workflows for your specific needs.
• Link with marketing tools and analytics platforms.
3. Cost Savings
• Reduce server load by eliminating constant API polling.
• Save staff time on routine tasks.
• Lower development costs with ready-to-use integrations.
• Minimize errors and data inconsistencies.
4. Customer Experience
• Send instant order confirmations.
• Provide real-time shipping updates.
• Maintain accurate inventory displays.
• Deliver personalized communications.
5. Business Growth
• Scale operations without proportional staff increases.
• Add new sales channels easily.
• Handle higher order volumes automatically.
• Focus resources on growth instead of maintenance.
How to set up a webhook in WooCommerce
Setting up a webhook in WooCommerce is much simpler than you might think:
- Log in to your WordPress dashboard.
- Navigate to WooCommerce > Settings > Advanced > Webhooks.
Image
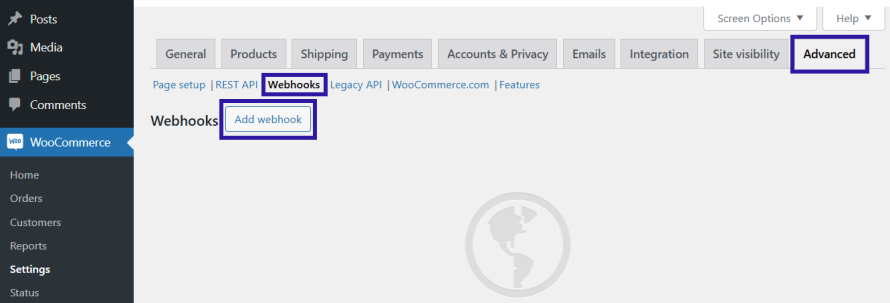
- Click the Add Webhook button. This will open the webhook settings page.
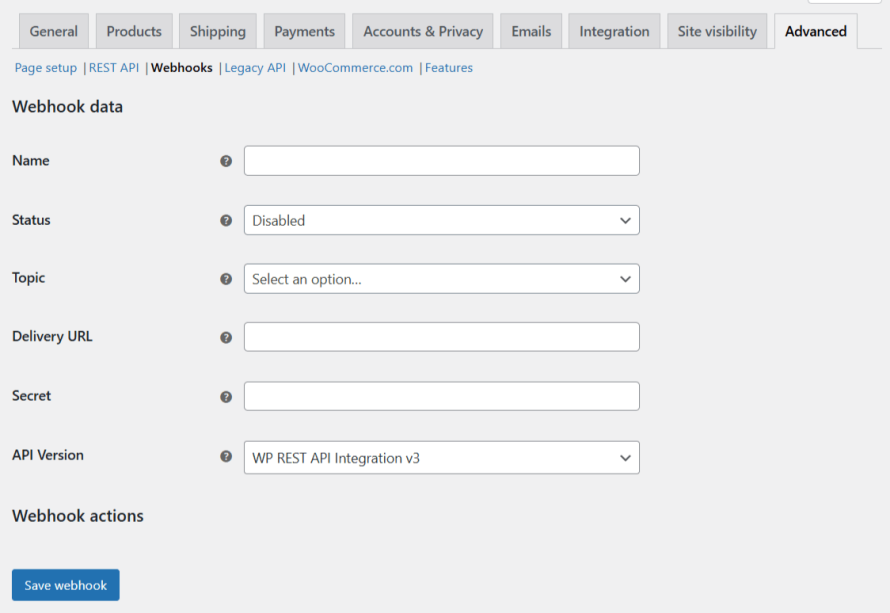
- Fill in the required fields:
- Name: Choose a name that clearly describes the webhook’s purpose, like "Order Created Notification."
- Status: Set the status to Active so the webhook starts working immediately.
- Topic: Select the event that will trigger the webhook:
- order.created – when a new order is placed.
- product.updated – when a product is modified.
- customer.updated – when customer details are updated.
- Delivery URL: Enter the URL where the webhook data should be sent. This is usually provided by the third-party service or app you’re connecting to.
- Secret: (Optional) Add a secret key for added security. This will allow the receiving app to verify that the data is coming from your store.
Image
- Ensure the receiving service or endpoint has the proper permissions to handle the webhook data. This might involve setting up authentication tokens or granting API access.
- Once you’ve filled in all the necessary details, click Save Webhook. WooCommerce will now generate a unique Webhook ID for tracking and managing the webhook in the future.
- After saving, WooCommerce will automatically send a test ping to the Delivery URL to confirm the connection. Check the receiving app or service to make sure the webhook data was received correctly.
And that’s it! Your webhook is live and ready to start automating tasks.
How to edit and delete webhooks
Managing webhooks in WooCommerce is just as simple as setting them up. Here’s how to edit them:
- Log in to your WordPress dashboard.
- Navigate to WooCommerce > Settings > Advanced > Webhooks.
- You’ll see a list of all your existing webhooks. Find the one you want to edit and click on its name or Edit under the Actions column.
- Modify any of the fields as needed:
- Change the Name to reflect its new purpose.
- Adjust the Status (Active, Paused or Disabled).
- Update the Topic if you want it to trigger on a different event.
- Change the Delivery URL if the webhook should send data to a new location.
- Add or modify the Secret key for enhanced security.
- Click Save webhook to apply your updates.
And, if you no longer need a webhook, it’s best to delete it to avoid unnecessary data transfers. Here’s how:
- Follow the same path as above (WooCommerce > Settings > Advanced > Webhooks).
- Find the webhook in your list and click the Trash link under the Actions column.
- Once moved to the trash, you can permanently delete it if necessary by navigating to the trash folder and selecting Delete Permanently.
Pro tip: Before making significant changes or deleting a webhook, ensure no critical workflows rely on it. It’s always a good idea to test any updates to confirm everything is functioning as expected.
Now that you know how to manage your webhooks, let’s take it a step further and look at how to test them!
How to test webhooks in WooCommerce
Without proper testing, even a small misconfiguration can result in failed integrations, broken workflows or missing data. Testing webhooks is necessary to ensure they’re firing correctly and delivering accurate data to the specified endpoints.
The easiest way to do this is by using a tool designed to capture and analyze webhook requests. Popular options include:
- RequestBin: A user-friendly tool that provides a temporary URL to capture webhook data.
- Webhook.site: Another excellent option to inspect and debug webhook payloads.
- Your own endpoint: If you have a development environment, you can create an endpoint to log and test incoming data.
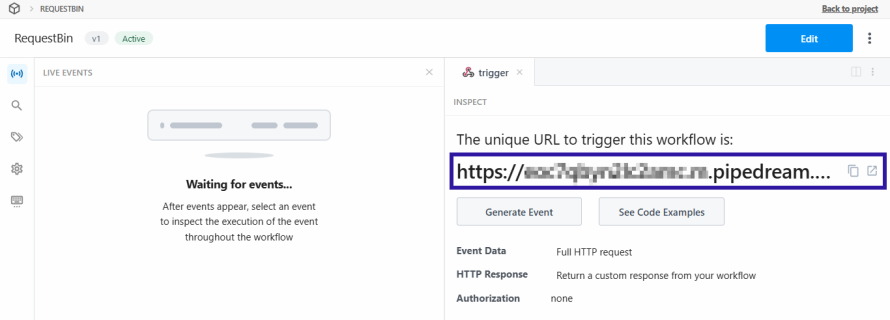
For this walkthrough, we’ll use RequestBin:
Go to RequestBin and copy the URL provided.
Image
- Replace the Delivery URL with RestBin’s URL by going to WooCommerce > Settings > Advanced > Webhooks.
- Save the webhook.
- Because webhooks are event-driven, so you’ll need to perform the action that triggers the webhook. For example:
- If the webhook is configured to fire on order.created, place a new test order in your WooCommerce store.
- If it’s set to product.updated, edit a product and save the changes.
- To review the webhook payload, go to RequestBin and check the following:
- Status code: Ensure the request returned a 200 OK status, which indicates the receiving endpoint processed the data successfully.
- Payload data: Review the JSON payload to verify it contains the correct data. For example, for an order webhook, ensure it includes the order ID, customer details and line items. And, for a product webhook, confirm the payload contains updated product details.
- Headers: Check the headers to verify that the secret key and other authentication details (if used) are included.
- After successful testing with tools like RequestBin, replace the temporary delivery URL with the actual endpoint URL of your live system. Run another test to confirm everything works in your production environment.
If the webhook doesn’t work as expected:
- Ensure the Delivery URL is correct and that the receiving endpoint is live.
- If you’re using a secret key, confirm it matches the key configured in the receiving application.
- Go to WooCommerce > Status > Logs and filter for webhook logs. These logs can help you pinpoint any errors or delivery failures.
Creating custom webhooks in WooCommerce
Custom webhooks allow you to go beyond WooCommerce’s built-in functionality by creating your own event triggers and workflows. They are user-defined triggers that fire whenever a specific event happens in your WooCommerce store. These events can be completely tailored to your unique use case, such as:
- Sending notifications for a custom order status e.g., "Order Packed".
- Notifying an external inventory management system about product updates.
- Pushing customer data to a proprietary CRM or analytics platform.
Unlike the pre-configured webhook topics in WooCommerce (like order.created or product.updated), custom webhooks allow you to define your own triggers and payloads, making them perfect for highly specific workflows.
Step 1: Identify your trigger event
Every webhook starts with an event. In WooCommerce, you can hook into existing actions or define your own custom triggers. Examples of events you might use include:
- A custom order status change e.g., "order_packed".
- A product added to a specific category.
- A coupon applied during checkout.
To find or create an event, browse the WooCommerce documentation for hooks and actions that fit your needs. If no default hook exists, define your custom event in your theme or plugin code.
Step 2: Add custom code to your site
You’ll need to write some code to define what your webhook should do. Add the following snippet to your site’s functions.php file (or better yet, in a custom plugin for maintainability).
Here’s an example of a webhook triggered when an order reaches a custom status (order_packed):
add_action('woocommerce_order_status_order-packed', 'send_custom_webhook', 10, 2);
function send_custom_webhook($order_id, $order) {
// Prepare the webhook payload
$payload = array(
'order_id' => $order_id,
'status' => 'order_packed',
'customer_email' => $order->get_billing_email(),
'items' => $order->get_items(),
);
// Define the URL where the webhook will be delivered
$webhook_url = 'https://your-custom-endpoint.com/webhook';
// Send the webhook data via HTTP POST
$response = wp_remote_post($webhook_url, array(
'method' => 'POST',
'body' => json_encode($payload),
'headers' => array(
'Content-Type' => 'application/json',
),
));
// Log errors or success
if (is_wp_error($response)) {
error_log('Webhook Error: ' . $response->get_error_message());
} else {
error_log('Webhook Sent Successfully to ' . $webhook_url);
}
}
The woocommerce_order_status_order-packed action triggers when an order’s status changes to order-packed (a custom status you may have defined). Then, a JSON payload is prepared with key order data. After this, the webhook data is sent to the specified delivery URL using wp_remote_post.
Step 3: Prepare the delivery URL
The delivery URL is where the webhook payload is sent. This could be a third-party service (like a CRM or analytics platform) or a custom API endpoint you’ve built.
The delivery URL should:
- Accept and process POST requests.
- Validate the incoming data to ensure authenticity (e.g., by checking a secret key).
- Respond with a 200 OK status to confirm receipt.
Here’s an example of what your receiving endpoint might do:
- Parse the incoming JSON data.
- Authenticate the request using a pre-shared secret key.
- Process the data (e.g., update a database, trigger an email, etc.).
Step 4: Add security
Without proper safeguards, your webhook could be abused or your data compromised. Follow these best practices:
- Add a unique secret key to the payload (or as a header). The receiving server should verify this key before processing the data.
- Ensure your delivery URL uses HTTPS to encrypt data in transit.
- Limit access to the receiving endpoint to trusted sources using IP whitelisting or API keys.
Here’s how to modify the webhook payload to include a secret key:
$payload = array(
'order_id' => $order_id,
'status' => 'order_packed',
'customer_email' => $order->get_billing_email(),
'items' => $order->get_items(),
'secret' => 'your-secret-key',
);
The receiving server should validate this key before processing the payload.
And you’re pretty much done. Of course, before deploying your custom webhook to production, don’t forget to test it and continuously monitor its performance to ensure:
- The webhook fires as expected.
- The data reaches its destination without errors.
- The receiving system processes the payload correctly.
Troubleshooting common webhook issues in WooCommerce
Even with the power and flexibility of WooCommerce webhooks, issues can arise that disrupt their functionality. When webhooks fail to fire, send incorrect data or cause other problems, it can lead to broken workflows and inefficiencies.
Fortunately, most webhook issues are straightforward to diagnose and resolve with a methodical approach. Here’s a breakdown of common webhook problems and how to address them effectively:
Invalid or incomplete payload
When the webhook fires but delivers an invalid or incomplete payload, it can lead to errors in the receiving system, especially if it relies on specific fields or data structures. To resolve this, make sure the payload includes all required fields and that the data matches the format expected by the receiving system. For example, if the receiving system expects an order ID to be an integer, but the webhook sends it as a string, the integration may fail.
If the payload data is incorrect, check the topic you’ve selected for the webhook in WooCommerce. Each topic corresponds to a specific type of event and choosing the wrong topic can result in a payload that doesn’t include the desired data. For instance, if you’re trying to send order information, ensure the topic is set to something like order.created or order.updated.
If the issue persists, verify whether any custom filters or plugins are modifying the webhook payload before it’s sent. In some cases, custom code or third-party plugins can inadvertently alter the data structure, causing problems downstream.
Authentication errors
Authentication errors occur when the receiving system rejects the webhook request because it cannot verify its authenticity. This often happens when the secret key configured in WooCommerce doesn’t match the one expected by the endpoint or when additional authentication mechanisms like API keys are required but not provided.
To fix this, first confirm that the secret key in the WooCommerce webhook settings matches the one configured on the receiving server. The secret key is used to generate a signature included in the webhook request headers, allowing the receiving server to validate the request. If the secret key is incorrect or missing, the server will reject the webhook with a 401 Unauthorized error.
If the receiving server requires additional authentication, such as an API key or OAuth token, make sure these details are included in the request headers. You may need to work with the administrator of the receiving system to ensure all authentication requirements are met.
To test authentication, use a tool like Postman or Insomnia to manually send a webhook request with the necessary authentication details and confirm that the receiving server accepts it. This can help pinpoint any issues with the WooCommerce configuration.
Webhook trigger issues
Sometimes, a webhook doesn’t fire at all, even when the associated event occurs. This issue is often caused by inactive webhooks, misconfigurations or conflicts with other WooCommerce extensions.
To troubleshoot, start by checking the status of the webhook in WooCommerce. Navigate to WooCommerce > Settings > Advanced > Webhooks and confirm that the webhook is marked as active. An inactive webhook will not trigger, regardless of the event.
Next, verify that the event associated with the webhook is actually occurring. For example, if the webhook is supposed to fire on order.created, place a test order in your store to trigger the event. If the webhook still doesn’t fire, test in a staging environment to rule out conflicts with caching plugins or third-party extensions that may interfere with WooCommerce’s default behavior.
If all else fails, enable debugging in WooCommerce by adding the following lines to your wp-config.php file:
define('WP_DEBUG', true);
define('WP_DEBUG_LOG', true);
This will create a debug log that you can use to identify any errors or conflicts preventing the webhook from firing.
Duplicate webhook notifications
Duplicate webhook notifications occur when the receiving system processes the same event multiple times. This often happens because the receiving endpoint doesn’t respond with a 200 OK status, prompting WooCommerce to resend the webhook.
To resolve this, ensure the receiving server is configured to respond with a 200 OK status upon successfully processing the webhook. This lets WooCommerce know the notification was received and prevents unnecessary retries.
Additionally, implement idempotency in the receiving system to handle duplicate notifications gracefully. For example, the receiving server can track webhook events using a unique ID and ignore duplicates if the same event is processed more than once.
Slow or delayed webhooks
Slow or delayed webhooks can disrupt real-time workflows. This issue typically arises from network latency or inefficiencies on the receiving server.
First, you’ll need to test the response time of the receiving server. Use Pingdom or Postman to measure how quickly the endpoint responds to requests. If the server is slow, work with your hosting provider to optimize its performance.
On the WooCommerce side, ensure your store’s hosting environment is optimized for speed. Pantheon’s high-performance infrastructure, for example, ensures that webhook requests are sent without delays, keeping your workflows efficient and responsive.
Optimize your WooCommerce store with Pantheon
Webhooks are an essential part of building a modern, automated WooCommerce store. They allow you to easily integrate your store with third-party services, create custom workflows and ensure real-time communication between systems. However, to fully unlock the potential of webhooks – and ensure they run smoothly – you need a hosting platform that delivers speed, scalability and reliability.
As a leading platform for WordPress and WooCommerce hosting, Pantheon provides the tools and performance to handle webhook-driven workflows effortlessly. Here’s why Pantheon is the perfect fit for your WooCommerce store:
- Unparalleled speed: Pantheon’s high-performance infrastructure ensures that webhook requests are sent and received without delays, providing real-time updates across your systems.
- Developer-friendly tools: With advanced tools like Multidev and automated workflows, Pantheon makes it easy to test and deploy webhook-related updates without downtime.
- Security you can trust: Built-in SSL, DDoS protection and an enterprise-grade firewall keep your data and integrations secure, giving you peace of mind when managing sensitive information.
By pairing WooCommerce’s powerful webhook capabilities with Pantheon’s optimized hosting environment, you can create an efficient, secure and scalable e-commerce operation that delivers a top-notch experience for your customers.
Experience the difference Pantheon can make today with streamlined workflows, enhanced performance and new possibilities with WooCommerce webhooks. Let’s make your store smarter, faster and future-ready!