Complete Headless WordPress Setup and Deployment Playbook
This playbook is designed for developers, architects and technical decision-makers who want a clear, end-to-end understanding of a decoupled or headless WordPress setup – from foundational concepts to real-world deployment considerations. We’ll break down how decoupled WordPress works, how to set it up correctly, the trade-offs you should evaluate and how leading brands are using it in production today.
What is decoupled/headless WordPress?
Decoupled (or headless) WordPress is a modern way of using WordPress where content management and website presentation are separated into two independent layers.
In a traditional WordPress site, WordPress does everything. It stores content and renders the final HTML using PHP themes. When a visitor loads a page, WordPress handles the request end-to-end – querying the database, running PHP templates and returning a fully rendered page.
Image
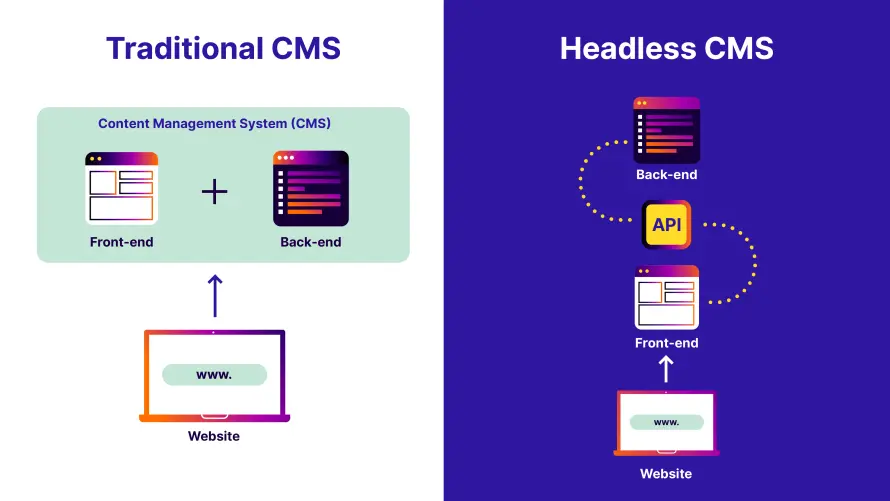
With decoupled/headless WordPress, this tight coupling is loosened. WordPress continues to manage content in the familiar admin dashboard, but some or all of the presentation logic moves elsewhere. Content is exposed via APIs and other systems – JavaScript frontends, search services or interactive components – can fetch that content as structured data instead of relying entirely on WordPress themes.
However, there is a subtle distinction that’s important to understand. Decoupled WordPress is the broader concept. The backend and frontend are separated to some degree, but WordPress may still render parts of the site. For example, a site might use a traditional WordPress theme for most pages while powering search, filtering or interactive features through API-driven JavaScript. These hybrid approaches are common during gradual migrations.
Headless WordPress is a specific type of decoupled architecture where the separation is complete. WordPress no longer controls page rendering at all. It acts purely as a backend content system, exposing data through the REST API or GraphQL. A separate frontend application – built with frameworks like Next.js or React – is fully responsible for routing, rendering HTML and delivering the user experience.
Nonetheless, in a headless setup, visitors never interact with WordPress directly. The frontend receives the request, fetches content from WordPress as JSON and renders pages using static generation, server-side rendering or a hybrid approach. This gives teams full control over performance, design and delivery strategies.
This architectural separation is what enables the speed, flexibility and multi-platform delivery that modern organizations increasingly require.
How to set up a headless WordPress website
Step1: Prepare for a headless WordPress Setup
The first decision is hosting. Your host needs to support clean routing, modern PHP versions, HTTPS and predictable performance for API traffic.
After this:
- Decide early how WordPress and your frontend application will be separated. In most headless projects, WordPress lives on a subdomain such as cms.example.com, while the frontend lives on the main domain. Making this decision early prevents you from having to reconfigure URLs, tokens and cookies later.
- Choose whether you want to use a plain React single-page app or a framework like Next.js. Frameworks such as Next.js support server-side rendering and static generation, which influence how and when GraphQL queries run. Locking this in early ensures that your API design and authentication approach align with your frontend’s capabilities.
- Install WordPress and keep the installation minimal to reduce plugin conflicts and improve API reliability.
- Enable HTTPS from the start.
Step 2: Configure permalinks
Even in an API-only setup, WordPress relies on its routing system to expose endpoints like GraphQL. By default, WordPress may use Plain permalinks, which generate URLs such as:
?p=123
This causes problems in headless architectures. APIs like GraphQL are better exposed through clean, path-based URLs, for example:
/graphql
Plain permalinks can force GraphQL into query-string endpoints, which may break caching, proxies or frontend frameworks like React and Next.js.
To fix this, go to Settings > Permalinks in the WordPress admin and choose any option except Plain. The Post name option is recommended because it is widely supported and predictable. After saving, WordPress regenerates its rewrite rules, allowing GraphQL to register a clean endpoint.
If you see 404 errors afterward, simply re-save the permalinks or verify that your server supports WordPress rewrite rules. Once this step is complete, your WordPress site is ready to safely expose a /graphql endpoint for your headless frontend.
Step 3: Install WPGraphQL and verify it works
WPGraphQL fundamentally changes how WordPress exposes its content by providing a strongly typed GraphQL schema that represents posts, pages, users, media, taxonomies and custom content types. Instead of making multiple REST requests or receiving more data than you need, GraphQL allows your frontend to request exactly the fields it requires in a single query.
To get started:
- Install the WPGraphQL plugin from the WordPress Plugin Directory and activate it. After activation, WordPress automatically registers a GraphQL endpoint at /graphql. You do not need to create routes or write server-side code – WPGraphQL integrates directly into WordPress’s routing system, which is why the permalink step was necessary. Once activated, you’ll see a new GraphQL menu item in the WordPress admin. This menu gives you access to plugin settings and to the built-in GraphiQL IDE.
- Check the GraphQL endpoint directly by going to the following URL in your browser:
https://your-site.com/graphql
If everything is configured correctly, you will not see a typical webpage. Instead, you’ll see a mostly blank screen or a minimal message. This is expected. GraphQL endpoints are not meant to render HTML; they exist solely to accept queries from clients like your frontend app. Seeing anything other than a 404 or server error is a good sign.
- Navigate to the GraphQL IDE from the WordPress admin dashboard.
- Run a simple test query in the query panel, such as fetching your site’s title and URL plus the latest five posts with their IDs, titles and slugs.
query Test {
generalSettings {
title
url
}
posts(first: 5) {
nodes {
id
title
slug
}
}
}
When you execute the query, you should immediately see structured JSON data returned in the response panel. This confirms that WordPress routing is working, WPGraphQL is active and your site’s content is accessible through GraphQL.
Step 4: Create your Next.js frontend and connect it to WordPress GraphQL
The frontend is your real website, rendering pages, handling routing and deciding what data to request from WordPress. You can do this with plain React, but Next.js is usually the better default because it supports server rendering, static generation, caching and SEO-friendly output out of the box.
Next.js is a Node.js application that runs locally during development and gets deployed separately later.
On your development machine:
- Install nvm and Node.js (including npm).
- Navigate to the folder where you want the project to live and run the following in your terminal:
npx create-next-app@latest my-headless-site
cd my-headless-site
npm install @apollo/client graphql @apollo/client-integration-nextjs
The first line downloads and scaffolds a brand-new Next.js project into a folder named my-headless-site. The second line moves your terminal into that new folder so you can run commands inside the project. The third line installs Apollo Client and GraphQL dependencies so the Next.js app can fetch and render data from a GraphQL API. Apollo Client is optional. If you prefer a lighter setup, Next.js can query a GraphQL endpoint using the native fetch() API. Apollo is used here to simplify caching, state management and data reuse across components.
- Start the dev server with the following command:
npm run dev
When it starts successfully, your terminal will print a local URL – usually http://localhost:3000. Open that URL in your browser and you should see the default Next.js starter page running locally.
- Store the endpoint in Next.js by creating a file name .env.local in the root of your Next.js project (same level as package.json). In it, add the following line (replace with your real domain):
WORDPRESS_GRAPHQL_ENDPOINT=https://YOUR-WP-DOMAIN.com/graphql
- Restart your Next.js dev server by stopping it with Ctrl + C and starting it again. This matters because env vars are loaded at startup.
Step 5: Add a fetchGraphQL helper in app/page.tsx
The fetchGraphQL helper is a simple function that sends a POST request to your WordPress GraphQL endpoint, includes your GraphQL query in JSON ({ "query": "..." }) and returns the parsed JSON response.
Open the app/page.tsx file in your Next.js project and add the following code (if code already exists, replace it with the following):
export const revalidate = 0; // disable caching while testing
async function fetchGraphQL(query: string) {
const endpoint = process.env.WORDPRESS_GRAPHQL_ENDPOINT;
if (!endpoint)
throw new Error("Set WORDPRESS_GRAPHQL_ENDPOINT in .env.local");
const res = await fetch(endpoint, {
method: "POST",
headers: { "Content-Type": "application/json" },
body: JSON.stringify({ query }),
cache: "no-store",
});
const json = await res.json();
if (!res.ok || json.errors) {
throw new Error(JSON.stringify(json.errors ?? json, null, 2));
}
return json.data;
}
export default async function Home() {
const data = await fetchGraphQL(`
query {
posts(first: 5) {
nodes { title slug }
}
}
`);
const posts = data?.posts?.nodes ?? [];
return (
<ul>
{posts.map((p: any) => (
<li key={p.slug}>{p.title}</li>
))}
</ul>
);
}
This page is a minimal server-rendered Next.js page that proves your WordPress site is working as a headless CMS via WPGraphQL. When the page is requested, Next.js runs the code on the server, fetches content from WordPress using GraphQL and renders the result directly into HTML before sending it to the browser.
Here’s how this happens:
- The revalidate = 0 export tells Next.js not to cache the page while you are developing or testing.
- The fetchGraphQL function is a small helper that sends GraphQL queries to WordPress. It reads the GraphQL endpoint from the WORDPRESS_GRAPHQL_ENDPOINT environment variable, which keeps sensitive or environment-specific URLs out of your source code. If the variable is missing, the function throws a clear error so the problem is obvious right away.
- Inside this function, fetch sends a POST request to the WPGraphQL endpoint with a JSON body containing the GraphQL query. WPGraphQL expects requests in this format. The response is then parsed into a JavaScript object using res.json(). Even when GraphQL returns an HTTP 200 status, it can still include logical errors, so the code checks both the HTTP status and the presence of a GraphQL errors field and throws an error if either exists.
- The Home component is marked as async, which allows it to wait for the WordPress data before rendering. In the Next.js App Router, pages are server components by default, so this function runs on the server, not in the browser.
- Inside Home, a simple GraphQL query requests the latest five WordPress posts and asks only for the title and slug fields.
Once the data is returned, the code safely extracts the list of posts. If no posts are available or something is missing, it falls back to an empty array instead of crashing the page. The component then renders a basic unordered list, looping over the posts and displaying each title. If the titles appear in the browser, it confirms that WordPress, WPGraphQL and Next.js are successfully connected in a headless setup.
Step 6: Deploy
At this point, the core headless connection is complete. Your Next.js frontend can successfully fetch and render content from WordPress using WPGraphQL. Of course, this is only a minimal implementation. Everything beyond this is up to you and your needs: you can add dynamic routes for individual posts, build page templates, integrate a design system, introduce caching and revalidation or connect additional WordPress data such as menus, custom fields or blocks.
To deploy the Next.js app, push your project to a Git repository (for example, GitHub). Then connect that repository to a hosting platform that supports Next.js, such as Vercel. During setup, configure the same environment variable used locally (WORDPRESS_GRAPHQL_ENDPOINT) in the hosting provider’s environment settings, pointing it to your production WordPress /graphql endpoint.
Once deployed, the hosting platform will build your Next.js app, run the same GraphQL queries against your live WordPress site and serve the rendered pages globally. If the post titles appear on your deployed site just as they did locally, your headless WordPress site is now live. From here, you can iterate freely on frontend features without touching WordPress, which is the core advantage of going headless.
Setting up a decoupled/headless WordPress website on Pantheon
If you’re using Pantheon, your WordPress decoupled setup will have a clean three-layer model, which represents Pantheon’s long-term direction for decoupled frontends.
Layer one is the WordPress backend (CMS), which will run on Pantheon and will be used purely for content management. Layer two is the Next.js frontend (presentation layer), also hosted on Pantheon (currently in private beta, so access requires approval). Tying everything together is the third layer, which is Pantheon’s infrastructure. Pantheon provides:
- Performance and security: Pantheon offers a global CDN for fast delivery, Git-based CI/CD for automated deployments and enterprise-grade security features such as free, managed HTTPS and DDoS protection. These capabilities protect and accelerate the WordPress APIs that your Next.js, React or mobile frontends depend on.
- A container-based, serverless architecture: Each site environment runs in its own isolated container, which removes the need for server provisioning, tuning or patching. This architecture enables predictable performance, horizontal scalability and high availability without downtime.
- A Dev, Test, Live workflow: Teams working with a decoupled WordPress site often need to change fields, GraphQL schemas or REST endpoints without breaking production apps. I Pantheon, development happens in a writable Dev environment with Git access. Changes are promoted to Test, where code becomes read-only and production content is synced down to simulate real-world conditions. Live is optimized for stability and performance, with a locked file system that prevents unauthorized changes.
- Multidev (per-branch environments): Multidev is especially powerful for decoupled WordPress because it creates a full back-end environment for every Git branch. Frontend teams can connect their feature branches to matching WordPress instances with the exact schema, content and media they need. This enables true parallel development of APIs, editorial workflows and frontends – without blocking releases or overwriting each other’s work.
- Terminus CLI and CI/CD integration: Terminus is Pantheon’s command-line interface that exposes nearly every platform action: site creation, backups, deployments, environment cloning and more. This makes Pantheon highly automatable and well-suited for decoupled CI/CD pipelines.
As you can see, Pantheon provides a tightly integrated environment that scales operationally as well as technically.
Pros and cons of decoupled sites
The most immediate benefits of decoupled sites include:
- Enhanced performance: By delivering content as data and rendering pages using static generation or server-side rendering, decoupled sites routinely achieve faster load times than traditional CMS-driven pages. Also, faster performance improves Core Web Vitals, reduces bounce rates and has a direct impact on conversions – especially for e-commerce and content-heavy platforms.
- True frontend flexibility: Developers are not constrained by themes or server-side templates and can use modern frameworks and tooling that best fit the project. This freedom makes it easier to build highly interactive experiences, custom user flows and advanced personalization without fighting CMS limitations.
- Omnichannel delivery: Content lives in one place but can be reused across websites, mobile apps, kiosks, internal tools or third-party platforms. This “create once, distribute everywhere” model is a strong fit for organizations with complex distribution needs.
- Independent scaling: Traffic spikes affect the frontend, not the CMS, which reduces infrastructure strain and lowers the risk of outages. Security also improves, as the CMS is not publicly exposed and access is limited to authenticated APIs.
- Future-proof: Frontend technologies can change over time without requiring a CMS migration, protecting long-term investment.
However, there are some drawbacks to decoupled sites, like increased complexity and greater developer dependency.
You are effectively running two systems: a CMS backend and a frontend application. This requires more planning, stronger technical discipline and teams skilled in modern frontend development.
Also, many features that come “for free” in traditional WordPress – forms, search, comments, previews, SEO tooling – must be custom-built or integrated with third-party services. This can create bottlenecks where marketing teams rely heavily on developers for changes.
The content editing experience can suffer if preview workflows are not carefully implemented. Editors no longer see exactly how content will appear by default, which can slow publishing and increase back-and-forth unless preview solutions are built intentionally.
Decoupled sites are ideal when performance, scalability and multi-channel delivery are business-critical. They are less suitable for small, simple websites, teams with limited development resources or projects that rely heavily on traditional WordPress plugins.
Real examples of websites using headless WordPress
Al Jazeera is a well-known enterprise example of decoupled WordPress in production. Their decoupled approach is often framed as a “create once, publish everywhere” model: centralize content in WordPress, then distribute it to different digital experiences from the same source of truth. This decoupled architecture allows Al Jazeera to scale globally, support high-velocity editorial workflows and deliver content across web, mobile and emerging channels without duplicating CMS logic.
TechCrunch adopted a similar approach when it rebuilt its platform around a decoupled WordPress backend and a React-based single-page application. Instead of serving pages directly from WordPress, the site pulls JSON from the WordPress REST API and renders content in a fast, app-like frontend. This eliminated full page reloads, enabled richer interactions and allowed TechCrunch’s small engineering team to evolve the user experience without disrupting editorial workflows.
Decoupled WordPress hosting with Pantheon
Decoupled WordPress has matured into a proven architecture for teams that need performance, scalability and long-term flexibility. By separating content management from presentation, organizations unlock faster load times, stronger security, independent scaling and true omnichannel delivery – all while keeping WordPress as the editorial engine teams already trust.
But architecture alone isn’t enough. Decoupled success depends on the platform running it.
That’s where Pantheon stands out. With first-class WordPress hosting, a modern Next.js frontend platform, a global CDN, built-in security and a unified dashboard, Pantheon removes the operational friction that often makes decoupled setups hard to manage. Instead of stitching together multiple vendors, teams get a single, enterprise-ready foundation designed specifically for decoupled sites.
If you’re serious about building a future-proof decoupled WordPress setup – one that scales with traffic, teams and technology – Pantheon gives you the infrastructure, workflows and reliability to do it right.