Step-by-Step: Implementing Effective Workflows in Drupal
Keeping track of who’s doing what in content creation can feel like a juggling act, especially as your team expands and the workload grows. Without a solid plan, things can easily fall through the cracks.
Drupal, a content management powerhouse, has some great tools to help you simplify things in this regard. With customized workflows, you can make sure everyone knows their role, maintain high content standards and speed up how quickly everything gets published.
In this article, we’ll show you exactly how to set up these workflows in Drupal. We’ll help you make the most of what Drupal has to offer, whether you're looking to improve how your team works together, keep your content process smooth or just get things done faster!
Implementing effective Drupal workflows: an overview
A workflow in Drupal acts as a clear path for content to follow during its journey, from the initial draft all the way to publication and sometimes beyond. Think of it as a roadmap that helps everyone involved understand exactly where content is, what needs to happen next and who’s responsible for moving it forward.
The workflow’s primary purpose is to:
- Control content progression: You decide the exact path content takes before it’s published, ensuring a consistent review process.
- Assign permissions: Set clear boundaries on who can move content between states, providing structure and accountability.
- Maintain consistency: Every piece of content gets the same level of scrutiny, so nothing slips by unnoticed.
The benefits include:
- Improved content governance: Workflows give you more control over what gets published. By clearly defining what’s in each stage, you can ensure content is reviewed and approved before it goes live, reducing the risk of errors or off-brand material sneaking onto your site.
- Enhanced collaboration: Workflows help your team work together more smoothly by making it clear who’s responsible for each stage of the content lifecycle. This clarity reduces confusion and improves communication, making collaboration easier and more efficient.
- Streamlined approval process: With workflows, content approval becomes faster and more efficient. Automated notifications ensure the right people are alerted when it’s their turn to take action, minimizing delays and keeping a steady flow of fresh content on your site.
Now, if you’re going to implement a Drupal Workflow, it’s very important that you understand the key components:
- States are the different content stages. For example, the content might start as a "Draft," move to "Review," then to "Published," and eventually end up "Archived".
- Transitions are the actions that shift content from one state to another. For instance, moving content from "Draft" to "Review" might involve a transition called "Submit for Review."
- Roles and permissions: Different user roles, like Editor, Reviewer or Administrator, have specific permissions that determine who can perform transitions at each stage.
Drupal makes setting up workflows straightforward with its built-in tools. Starting from Drupal 8.5, the Workflows module is included in Drupal core. It lets administrators create custom workflows with defined states and transitions.
Additionally, the Content Moderation module works alongside the Workflows module to enable content moderation. It allows content to exist in various states without impacting the live version until it's fully approved, ensuring a smoother publication process.
Setting up custom workflows in Drupal: A step-by-step guide
Step 1: Installing the workflow modules
To kick off your Drupal workflow setup, you’ll first need to install the necessary modules. This process is straightforward and with a few clicks, you’ll have the tools you need to manage your content workflows effectively:
- Log in to your Drupal site's dashboard.
- In the top admin toolbar, click on Extend to see all available modules.
- Use the search bar to locate the Workflows module, which is part of Drupal’s core (optional). If it’s not enabled yet, check the box next to it.
Image
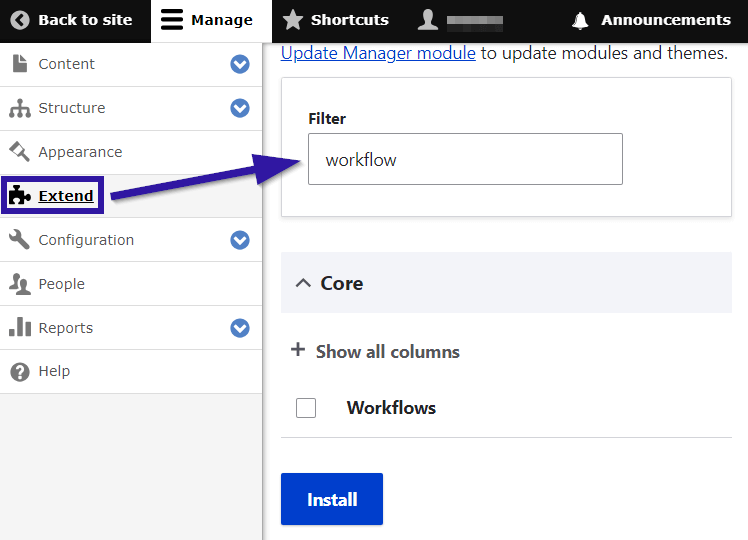
- We recommended checking the box to enable the Content Moderation module, too, because it works with the Workflows module to provide advanced moderation features.
- Scroll down and click the Install button to activate the modules. You’ll see a confirmation message when the installation is complete.
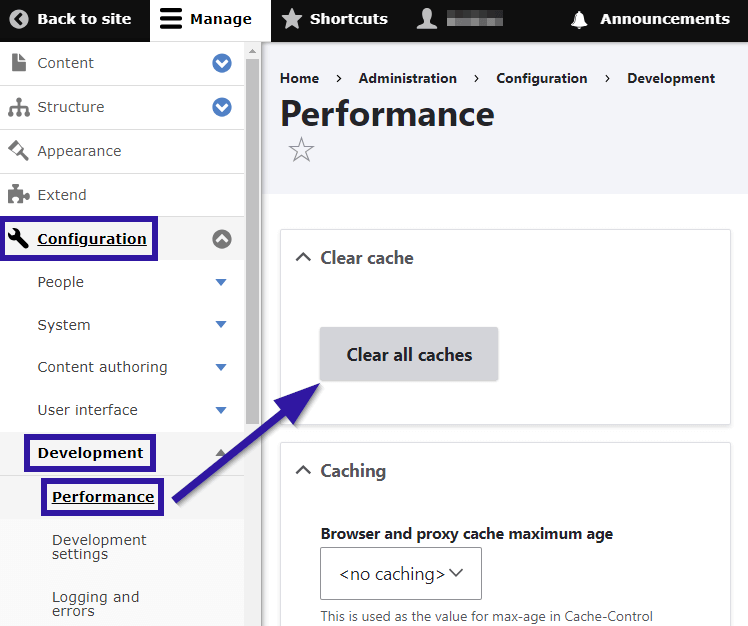
- Head to Configuration > Development > Performance and click Clear all caches to make sure everything runs smoothly. This step is optional but helpful.
Image
Step 2: Define the workflow and its states
It’s important to take a step back and plan how your workflow will function. A thought-out workflow ensures your content moves smoothly from creation to publication, with all the necessary checks and balances along the way:
- Think through the stages your content will go through, like "Draft," "Editorial Review," "Legal Approval," "SEO Optimization," "Published" and "Archived."
- Map out how content moves from one state to another, such as moving from "Editorial Review" to "SEO Optimization."
- Decide which roles (like Author, Editor, Legal Team) can perform specific transitions.
Now that you’ve mapped out your workflow, let’s get it set up in Drupal:
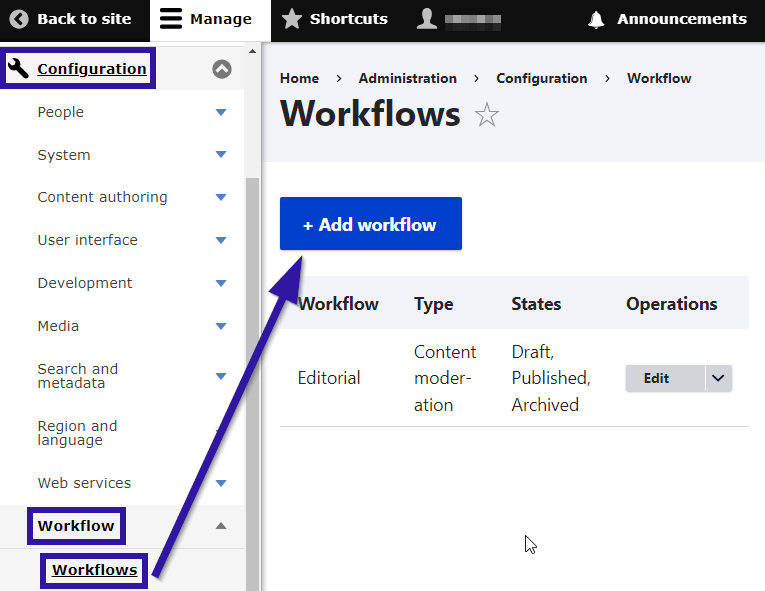
- Click on Configuration in the top toolbar, then under select Workflows.
- On the Workflows page, click Add workflow:
Image
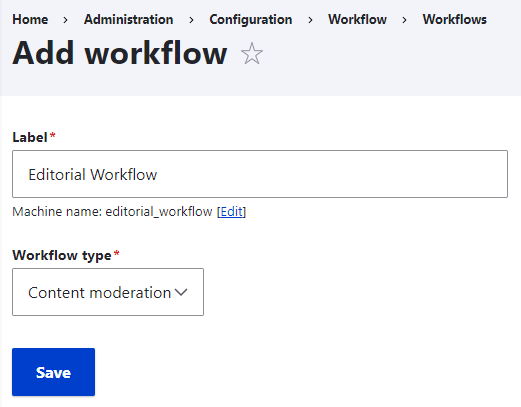
- Enter a descriptive name for your workflow (e.g., "Editorial Workflow"). Choose Content moderation as the type if you’ve enabled the Content Moderation module, then click Save.
Image
- After saving, go to the States section and click Add new state.
Image
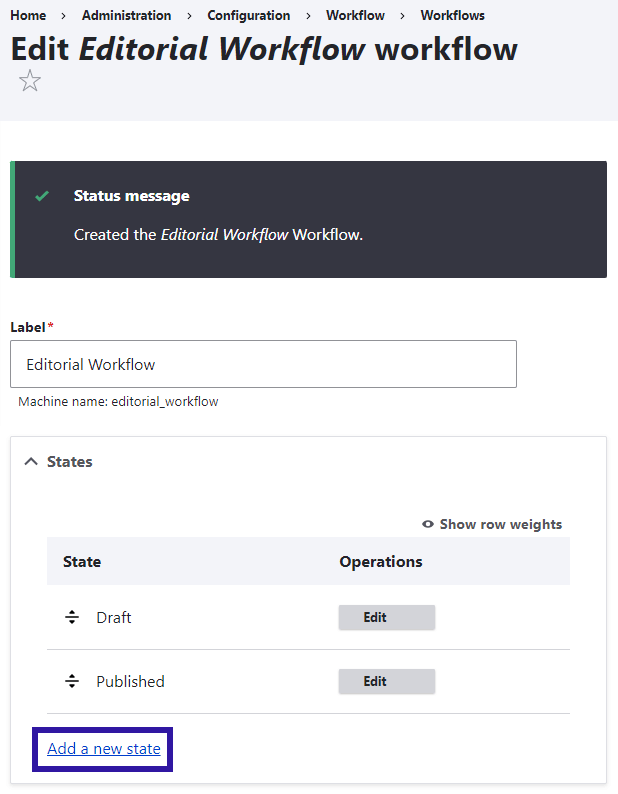
- Enter a name (e.g., "Review" or "Archived"), then click Save.
Image
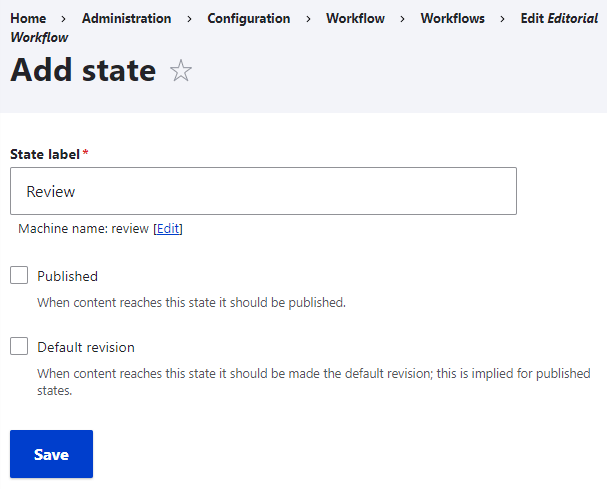
- Repeat this process until all the necessary stages are set.
- Go to the Transitions section and click Add a new transition.
Image
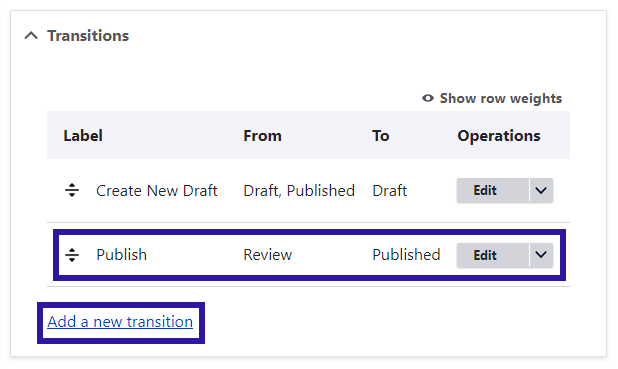
- Name the action (e.g., "Submit for Review" or "Publish"), then select the states this transition will move between. Click Save and keep adding transitions until your workflow is complete.
Pro tip: Make sure all the states and transitions are logically connected and reflect the actual content flow. Start simple and add complexity as needed.
Here’s a basic example of how a typical editorial workflow might look:
States
- Draft: Content is being created.
- In review: Content is ready for review.
- Published: Content is live on the site.
- Archived: Content is no longer active.
Transitions
- Submit for review: Moves content from Draft to In Review.
- Publish: Moves content from In Review to Published.
- Archive: Moves content from Published to Archived.
- Unpublish: Moves content from Published to Draft.
Step 3: Assign the workflow to content types
Now that your workflow is set up, it’s time to assign it to the content types that will use it. This step ensures that the content types – such as Articles or Pages – follow the workflow you’ve created, with all its states and transitions:
- From the top administrative toolbar, click on Configuration > Workflows.
- Locate the workflow you've created (e.g., "Editorial Workflow") and click on its Edit button.
Image
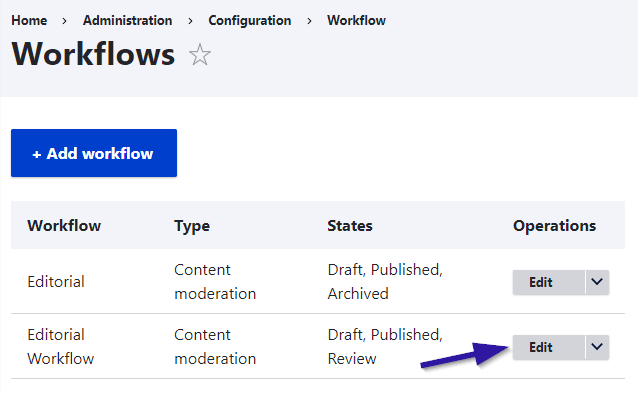
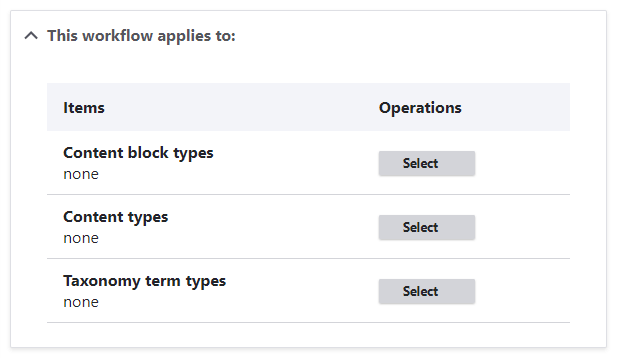
- In the workflow settings, find the section titled This workflow applies to. You'll see options for Content types.
- Check the boxes next to the content types you want this workflow to apply to.
Image
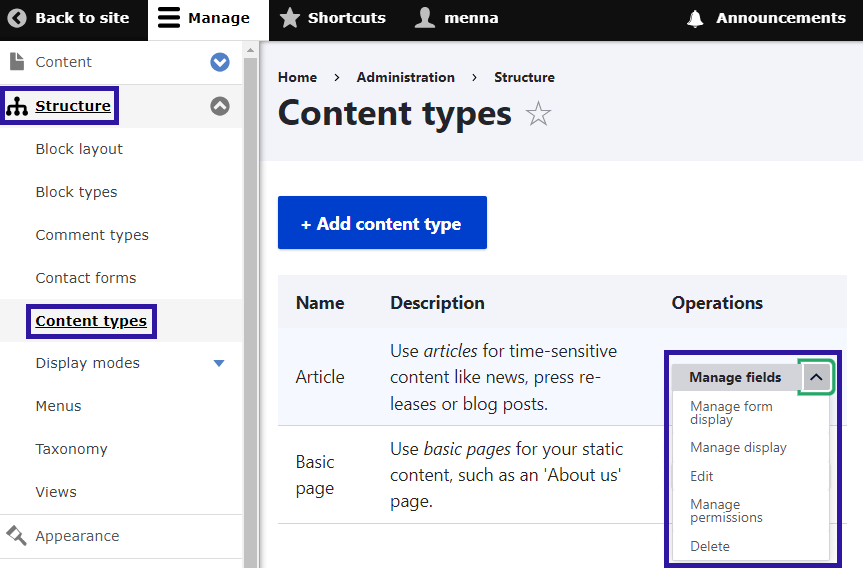
- If you want to edit any content type or add more fields to them, go to Structure > Content types.
Image
Step 4: Assigning permissions to roles
Finally, you’ll need to configure who has the power to move content through the workflow. But before you do that, you need to understand Drupal’s default roles:
- Anonymous user: Visitors who aren’t logged in. Typically, they won’t have any workflow-related permissions.
- Authenticated user: Users who are logged in but don’t have any special permissions.
- Administrator: Users with full access to administer the site and manage workflows.
You can also create custom roles like Content Author or Reviewer.
Now, to assign permissions:
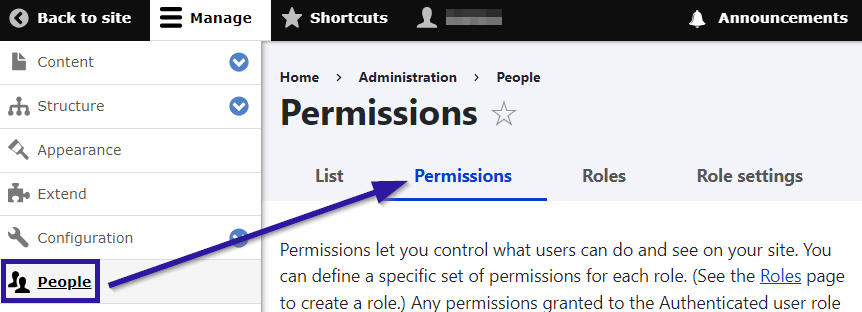
- From the top admin toolbar, click People, then select Permissions.
Image
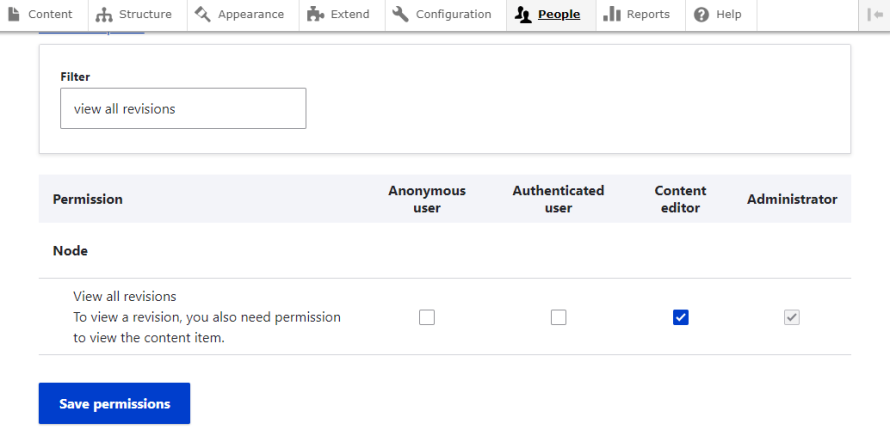
- Use the search box to filter permissions related to workflows. Important permissions include:
- Use the content moderation transition [transition name] allows users to perform specific transitions.
- Bypass content moderation allows users to publish directly without following the workflow.
- View all revisions allows users to see all versions of the content.
- Check the boxes for each role according to what actions they should be allowed to perform. Example permissions for roles may look something like this:
- Content Author can create content and submit it for review.
- Editor can review and publish content.
- Publisher can perform any transition, including bypassing moderation.
Image
- When you’re done, log in as different users to test that each role can only perform the actions they’re permitted to. Create content and transition it between states to ensure everything is working smoothly.
Take your Drupal workflow to the next level with Pantheon
While Drupal's workflow capabilities are powerful on their own, integrating them with Pantheon’s advanced hosting platform can take your content management and deployment processes to new heights. Pantheon supports your Drupal workflows with key performance and security enhancements such as:
- Caching and CDN: Pantheon’s built-in caching layers, along with its Global CDN, work together to boost site performance significantly. You can also take advantage of Pantheon’s edge configuration tools to fine-tune how your content is delivered, ensuring faster load times for your audience no matter where they are.
- HTTPS and security features: With automatic HTTPS encryption, Pantheon ensures that all data between your site and users is protected. This, along with additional security measures, helps safeguard your content throughout its lifecycle.
- Backup and recovery systems: Pantheon’s regular, automated backups provide peace of mind, knowing that you have a complete safety net in place. If something goes wrong, Pantheon’s one-click restore feature makes it easy to roll back to a previous state without hassle.
As you can see, by combining Drupal’s flexible workflows with Pantheon’s powerful platform, you not only streamline your content management but also boost performance, enhance security and ensure that your site is always running at its best.
Enhance Your Drupal Site: Start With Pantheon Today
Implementing effective workflows in Drupal can empower your team to manage content efficiently. However, while Drupal provides the tools to handle workflows internally, integrating with a platform like Pantheon takes things to the next level.
Pantheon enhances your site's performance, strengthens security and optimizes development processes, all while making it easier for your team to collaborate and manage content.
Unlock a world of efficiency, enhanced collaboration and top-tier performance for your Drupal site – try Pantheon for free today!