Step-by-Step Drupal Maintenance Guide
Image

Updating your Drupal site is essential, but it’s also a task that can cause a lot of headaches. The last thing you want is for someone to submit a form or make a purchase while you’re making changes, potentially causing errors or lost transactions.
But there’s an easy fix: Drupal’s maintenance mode. By temporarily taking your site offline for visitors, it gives you the control and peace of mind you need to complete updates without worrying about user interactions or data loss.
Let’s walk you through why maintenance mode is crucial for a smooth update process, how to set it up, and how to avoid common issues.
Why Drupal maintenance mode is essential for site updates
Maintenance mode temporarily takes your site offline for regular visitors while keeping access open for administrators. It’s designed to prevent users from interacting with your site while critical changes are being made. This:
- Prevents data loss or corruption: If a user tries to submit a form or make a purchase while an update is in progress, things can break. Enabling maintenance mode helps avoid this situation altogether.
- Protects user experience: It’s better to show a clean “site under maintenance” message than have users see broken layouts, error messages or slow load times.
- Helps developers maintain control: With maintenance mode on, only authenticated admin users can access the full site. That’s essential when troubleshooting or deploying configuration changes.
As you can see, a well-designed maintenance experience signals professionalism and trust. It communicates that you care about your users, your platform and your brand.
Without further ado, let’s get right into it!
Step 1: Creating effective custom maintenance pages
By default, Drupal displays a very simple message when maintenance mode is active. But with a little customization, you can create a page that reflects your site’s tone and provides clear communication to your visitors.
Here’s how to do it:
- In your theme directory, look for a file called maintenance-page.html.twig. If it doesn’t exist, you can create one based on your theme’s regular html.html.twig structure.
- Add your custom HTML and messaging. Include your logo, links to social media or even a contact form. It’s best to keep the message friendly and helpful. Also, set user expectations with a brief timeline if possible.
- After updating your theme files, run drush cr or use the admin interface to clear caches so the new page will be displayed.
- Add styles to your theme’s CSS files so your maintenance page looks consistent with the rest of your site.
With that in place, it’s time to move on to what really matters: performing updates safely.
Step 2: Perform changes/updates locally
Before deploying updates to your live site, it’s essential to first perform them locally. This ensures that you can catch any issues or incompatibilities early, reducing the risk of downtime or disruption to your users.
Here’s how to do it:
- Run the following command to update your dependencies and packages, which could include Drupal Core or contributed modules and themes:
composer update
- Commit and capture the changes to your composer.json and composer.lock files. This ensures that your updates are reproducible and tracked in version control.
- Run database updates by executing the following Drush commands to apply any necessary database updates and clear the cache:
drush updb
drush cr
- If your updates involve changes to the site's configuration, you’ll want to export those changes so they can be deployed to other environments. Run this Drush command to export your configuration:
drush cex
For Pantheon users, Autopilot automatically applies updates, runs visual regression tests and even creates pull requests so your team stays protected without the grunt work.
Now your site is updated and ready for testing on a staging or multidev environment!
Step 3: Push updates to a staging environment for testing
Once your local environment is updated, it’s time to test everything in a more controlled staging or multidev environment:
- On Pantheon, you can use Git to push the changes to a multidev environment.
- After deploying, SSH into your staging environment and run the following commands to ensure everything is up to date:
drush updb
drush cr
drush cim
- Test thoroughly. Check all areas of the site that could be affected by the updates, including functionality, styling, and performance. Make sure there are no regressions or issues before moving on to the live environment.
Step 4: Enabling and disabling maintenance mode in Drupal
To turn maintenance mode on (and off) in Drupal, you can either use the admin UI or Drush.
Using the admin interface
If you prefer clicking over command lines:
- Log in to your Drupal site as an administrator.
- Navigate to Configuration > Development > Maintenance mode.
Image

- Check the box labeled Put site into maintenance mode.
Image
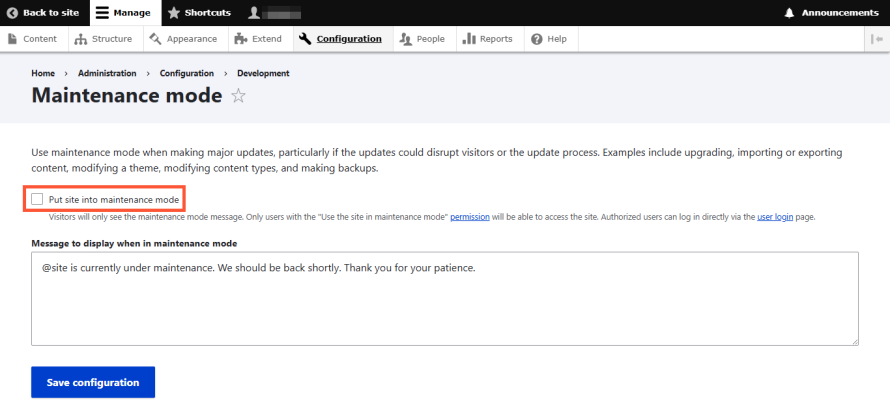
- Optionally, but recommended, customize the maintenance message your users will see.
- Save configuration.
Voilà. Your site is now politely holding the line while you work behind the scenes. Only users with the “Administer site configuration” permission will be able to access it.
To disable it, just uncheck the box and save again. Easy.
This method is ideal for quick updates and doesn’t require any command-line access.
Using Drush
For developers who live in the terminal and love automation, Drush (Drupal’s command-line interface) offers a faster and more scriptable way to manage maintenance mode.
Here are the basic commands:
- Enable maintenance mode:
drush sset system.maintenance_mode 1
drush cr
- Disable maintenance mode:
drush sset system.maintenance_mode 0
drush cr
The drush cr command clears the cache, which is necessary for the change to take effect immediately.
Did you know? On Pantheon, you can use the Dev or Test environments to simulate maintenance tasks without affecting the Live site at all.
Step 5: Release updates to the live environment
Once you’ve tested everything thoroughly in the staging environment and are confident that everything is working as expected, you’re ready to push your changes to the live site.
But first, take a backup of your live environment. This ensures that you can restore the site to its previous state if anything goes wrong.
After that, release the changes to the live environment by deploying the code through your provider's interface (again, using Git for Pantheon). Run the necessary Drush commands:
drush updb
drush cr
drush cim
drush cr
Step 6: Troubleshooting common maintenance mode issues
Maintenance mode is usually smooth sailing, but there are a few familiar hiccups that can throw off Drupal site managers. Let’s unpack the usual suspects and how to fix them fast:
Maintenance mode won’t turn off
Sometimes, after unchecking the Put site into maintenance mode box or running the Drush command to disable it, the site still shows the maintenance message.
To fix this, clear Drupal’s cache:
drush cr
Double-check the status with:
drush state:get system.maintenance_mode
If it returns 1, it means the site is still in maintenance mode. You’ll need to run:
drush state:set system.maintenance_mode 0
drush cr
This sets the state value to 0, which disables maintenance mode. And to make sure the change takes effect right away, clear the cache.
Locked out after enabling maintenance mode
If your user role doesn’t have the proper permissions, you might get locked out of the admin interface entirely.
To resolve this, use Drush to regain access:
drush uli
This generates a one-time login URL for an admin account.
The maintenance page doesn’t display the custom design
If you’ve created a custom maintenance-page.html.twig but don’t see it rendering:
- Confirm file location. It must be in your active theme’s root directory.
- Clearing the cache first with drush cr.
The site is still inaccessible after disabling maintenance mode
If the maintenance message is gone but the site isn’t loading correctly, cached assets or permissions could be at fault.
Again, clear all caches, then check file permissions, especially for updated modules or themes. You can even review log messages:
drush ws
Maintenance mode interferes with automated deployments
Automated pipelines might fail if maintenance mode is enabled at the wrong time.
Try including this at the end of your deployment script (such as in a GitHub Actions workflow or CircleCI job):
drush sset system.maintenance_mode 0
If you’re on Pantheon, you can use Quicksilver to automate post-deployment cleanup and disable maintenance mode automatically.
How Pantheon eliminates manual maintenance headaches
Maintaining a Drupal site the traditional way can get overwhelming and eat a huge chunk of your time. But if you’re on Pantheon, it’s easy!
Pantheon was built for teams that demand uptime, speed and confidence in every deployment. Here's how we take the “ugh” out of Drupal maintenance:
- Automated backups: Before you touch a single line of code, Pantheon has your back, literally. Every environment – Dev, Test and Live – gets daily automated backups and you can create on-demand ones before updates. That means if anything goes sideways during maintenance, rollback is just a click away.
- Multidev environments for risk-free testing: Why gamble with live updates? Pantheon’s Multidev environments let you clone your site into isolated sandboxes. You can test security updates, debug maintenance pages or preview a full release – all without affecting production. It’s maintenance without the stress.
- Autopilot: This is Pantheon’s automated update system for WordPress and Drupal. It applies core and contrib updates, then uses visual regression testing to make sure nothing breaks visually on your site. If everything checks out, it opens a Git pull request so you can review or auto-merge with confidence.
- Integrated DevOps workflow: Pantheon’s Git-based workflow, command line tools and API access let you automate everything, from enabling maintenance mode to deploying code with confidence. And since your environments are consistent and containerized, what works in Dev will work in Live. No surprises.
Upgrade your Drupal maintenance strategy today
Here’s the real takeaway: Drupal maintenance doesn’t have to be manual, stressful or disruptive. With the right workflows – and the right platform – it can be smooth and stress-free.
Pantheon is a WebOps platform built to support your entire lifecycle. It takes the heavy lifting out of maintenance and puts peace of mind back into your team's day-to-day.
So, if your current workflow involves late-night update scrambles, surprise downtime or duct-tape fixes across environments, maybe it’s time for an upgrade.
Try Pantheon today and take Drupal maintenance off your worry list!