Using The Tour Module For Better User Experiences
Image

As developers, we go to a lot of effort to create user experiences that we want to believe are intuitive. We often even create detailed documentation that we would love the user to read. The reality is that users typically just want to poke around and try to figure things out on their own. Sometimes this is a good path and other times, especially when we are introducing new or custom concepts, this can end with a lot of frustration.
A speaker I admire, namely Kelly Albrecht, once said something like “DevOps is not about tools, it is about shortening the feedback loop between developers and users.” He also suggested there was a path where we could meet our logged in users, right where they are, and explain, field by field, exactly how we intended them to use our new functionality. In Drupal 8, this is called the Tour module and it has been in core since Drupal 8 launched.
Image
Already In Place
Before we go any further, I encourage you to see this in action for yourself. If you currently have a Drupal 8 site you can use, go ahead, log in. If you do not have a current Drupal 8 site, we invite you to spin one up on Pantheon for free, and maybe even give our Terminus Build Tools a try, which leverages Composer, Github, and CircleCI.
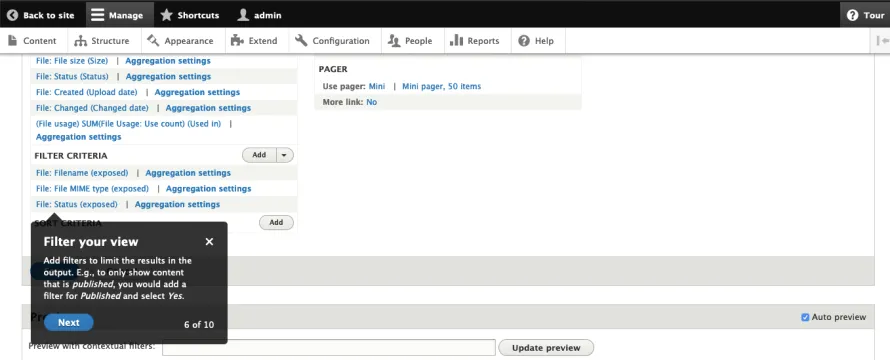
The Views edit screen is the only finished Tour included with Drupal 8. This is the one I showed in action in the above screenshot. You can interact with this by visiting '/admin/structure/views' on your own Drupal 8 site. In the admin interface in the far upper right-hand corner, you should see a Tour button beside a ‘?’.
Clicking this button will take you on a guided tour of editing that View, highlighting which fields do what, and how to make the best use of the tooling.
The Bad News and the Good News
If you are like me, you might have just gotten excited about the possibility of learning how to use all the admin screens of Drupal by taking a Tour of all the admin screens. Sadly, the only pre-loaded Tour is the one we just talked about. The good news is that it is pretty straightforward writing your own Tours to help your users by completely customizing it for your audience. This means whenever you write a new module you can explain, field by field, how the user can get the best experience without ever having to leave the page.
There are two ways we can go about creating a Tour: either by hand or by using the Tour UI module to assist in the process. Both paths work, but I am going to focus on the manual creation since it demystifies the process and might work better for some teams’ workflow.
It’s All About the YAML
No matter what path you take to implement a Tour, both end with a configuration stored as YAML. The YAML file contains the ID of the tour, the module we are referencing, the route to the particular page, and then the tour text itself, as well as some metadata.
The Tour API overview is the best document I found when I initially dug into the Tour module. I highly suggest you also read it, as it is the actual authoritative document on the subject. It took me a while to wrap my head around the examples given and I ended up writing my own template with instructional comments, which you can find on my Github project.
Let’s take a look at my example template.
Image
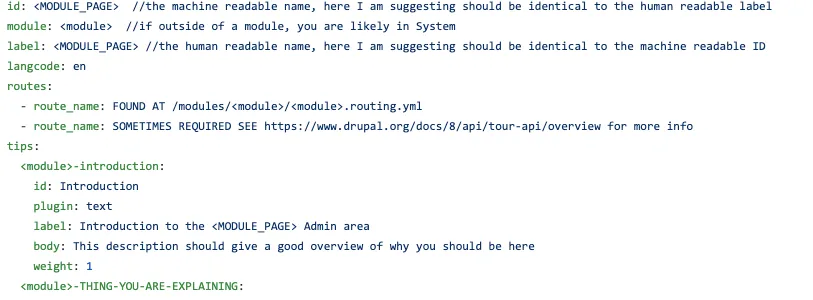
id: The first ‘id’ is the machine name for your tour. For example, if we are building a tour for the Configuration Import screen, located at ‘admin/config/development/configuration/full/import’ a good 'id' might be “config-import”
module: This is simply the name of the module for which we are writing this Tour. If you want to make a module for a Core function, System is likely what you need.
label: This is the human-readable name of the tour. I like to keep my id and my label the same because one thing is easier to remember than two.
langcode: If you are writing in English, it is EN. I can not find evidence that this would not work with other standard language codes, but no evidence in favor of that either. Please comment if you can point me at any docs for this.
Finding the Right Route
Looking up the next section, routes, is where things become a little more involved. One might think that the route would just be the path of the screen we want the tour to appear on. It is not. In Drupal, each path is set by a route that contains a path and certain other important details in a routing.yml file.
We have a couple of ways to discover the correct route: manually, or using the Devel module. Again, I prefer the manual lookup approach as it demystifies Drupal a bit. This also means one less module, and associated configuration, to keep up to date. Let’s look at the manual lookup first.
For any module, this can be found at '/<module>/<module>.routing.yml' in the code base. For example, for the config module, we can see the routing here:
Image
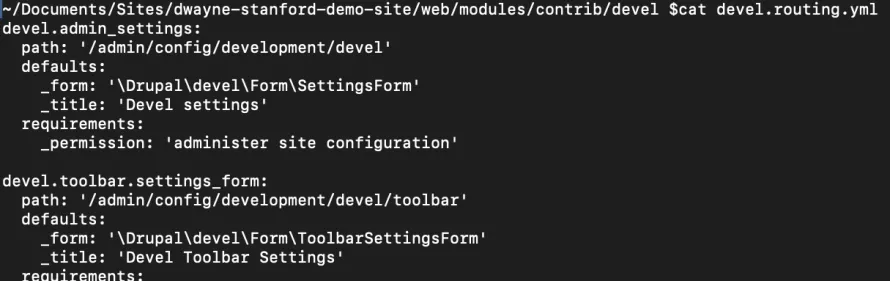
Next, navigate to the page on Drupal admin screen for which we want to write a tour. This gives me a path in as part of the URL. For example, if I want the route for the ‘/admin/config/development/devel’ path, then I would discover it is part of the ‘devel.admin_settings’ route.
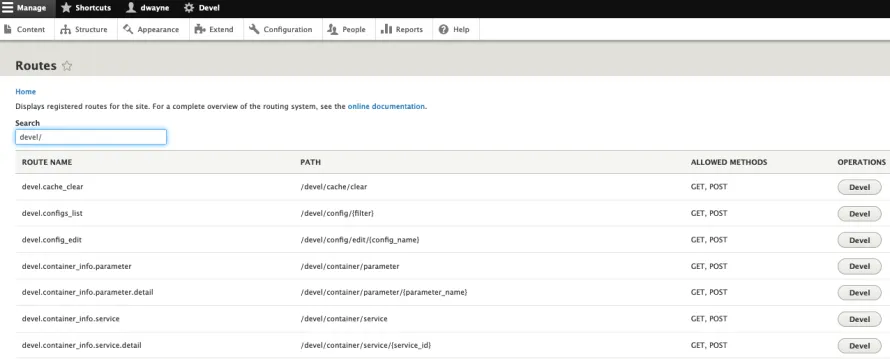
If you prefer the automated method, you can also leverage the Devel module to look up a route by path. If Devel is active, you can find the routes lookup interface at ‘/devel/routes’ and use the search to find your routes.
Image
A note on multiple routes: If I want to have the same tour apply to 2 different yet similar screens, I can add additional routes. For example, adding and editing a user have very similar menu layouts, so I could use the same tour for each by setting my routes to:
routes:
route_name: entity.user.edit_formroute_name: user.admin_create
Adding Your Tips, the Heart of the Tour
Just like any good tour guide, the tips you give your users will help determine how good of a time they have. I like this terminology for writing the individual tour elements. There is no set number of tips you can have and no limit on the length of each individual tip you write. It is completely up to you.
Each tip looks similar, but let’s look at the first from my template.yml:
Image
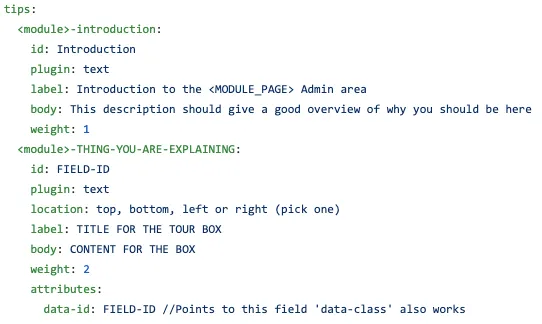
tips: This is just the header for this part of the YAML. Don’t change this.
Tour Name: In my example, these are called ‘<module>-introduction’ and ‘<module>-THING-YOU-ARE-EXPLAINING’. There is not a hard rule to naming these, but in my opinion, keeping the module name as part of this field will help when writing many of these.
id: This is different than the Tour id from before, and will serve as the unique identifier for this tip.
plugin: For the time being, the only plugin implemented in Tours is ‘text’. However, Joyride, the jquery library it is based on, accepts video, html, and some other formats. This means you could make any format work, depending on how much you are willing to roll up your sleeves and figure it out.
location: If the ‘attributes’ section is defined later in the YAML, this will determine what side of the referenced element the tour will appear with an arrow indicating what it is pointing to. If missing, the tour will default to top.
label: This is the title that appears at the top of the tour tip.
body: This is where you put the sentence or paragraphs of description of what you are trying to explain. There is no limit I can find on length for the body. Be as descriptive as you like. You can even use basic HTML elements like <br> and <a href=...>.
weight: This determines in which order the tips appear.
attributes: This section is not always present. If it is, it will let us define where the tour tip points. If not defined, this means we will get a box hovering over the center screen.
data-id: This is the area to define what specific element we point to on the page. Ideally, we can use a class id, which should be unique on the page. However, not all pages were written with unique ids. In those cases, we can substitute data-class and point to a class name, but if the same class is reused, results can be unexpected as the module evolves. For example, on the page ‘admin/config/development/configuration/full/import’ the file section field has an id of ‘edit-import-tarball’. So in my YAML, I would set: data-id: edit-import-tarball.
I’ve Got My YAML Written, Now What?
Once we have all the internals defined, it is time to test this out for your site. You will want to save your tour in the format 'tour.tour.<tour-id>.yml'. This is how Drupal is expecting the file. The documentation suggests storing this inside your module in the config folder in a subfolder called optional. I like to store mine directly in config as I would prefer they not be optional.
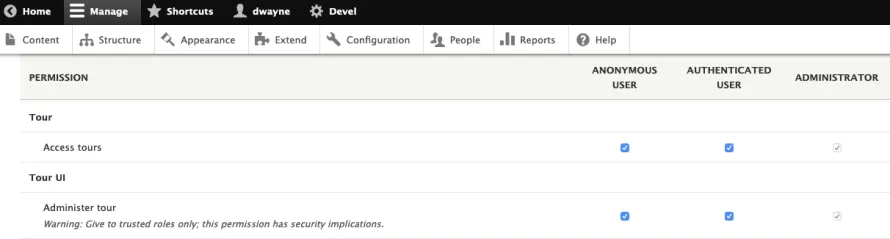
Next, we need to ensure tours are enabled for our intended users, most probably authenticated users. To achieve this, find the 'Access tours' section at ‘/admin/people/permissions’ and ensure the configuration is set for your chosen users. Also, and just as importantly, Tours are only visible in the Toolbar, so we must enable that too for our target user role.
Image
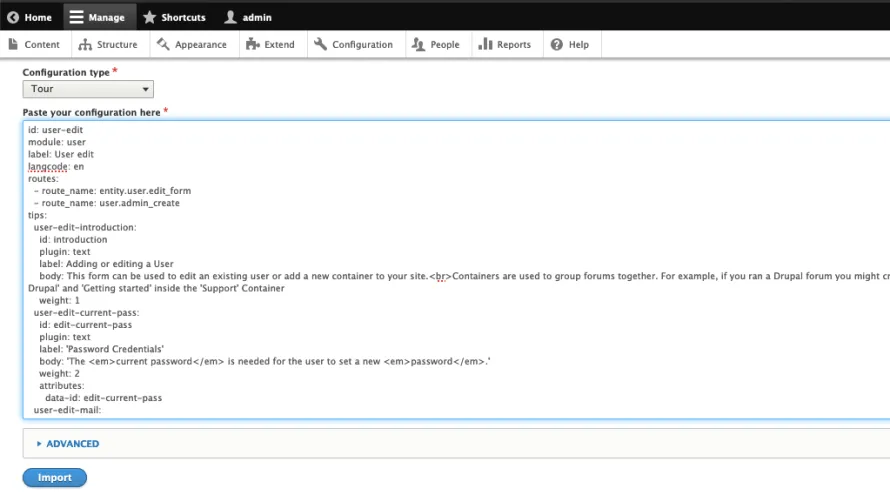
Now, we must import that YAML. We could do this with Drush based on file location, but for individual tours, I prefer to do a ‘single item import’ in the configuration management menu, found at ‘admin/config/development/configuration/single/import’. Just let it know the Configuration type ‘tour’, paste in your YAML text, and hit Import.
Image
A quick note on deleting an existing tour: This is where Drush really comes in handy. With a quick 'drush config-list' you can see all the individual configurations and with ‘drush config-delete’ you can specify which from that list you want to delete. This is the fastest and most reliable way I have seen for deleting tours.
Isn’t There A GUI For All This?
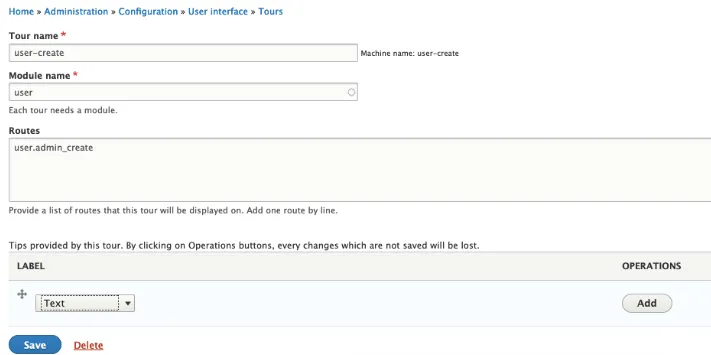
As I mentioned earlier in this post, there is another path to making a tour rather than handwriting your YAML, and that is the Tour UI module. This module provides a very clear path for creating a tour once you determine your routes.
After installing and enabling the module, you can find the interface at ‘/admin/config/user-interface/tour’. Next, name your tour, just like we would have set the id in our YAML in the other method. Finding routes works exactly the same way.
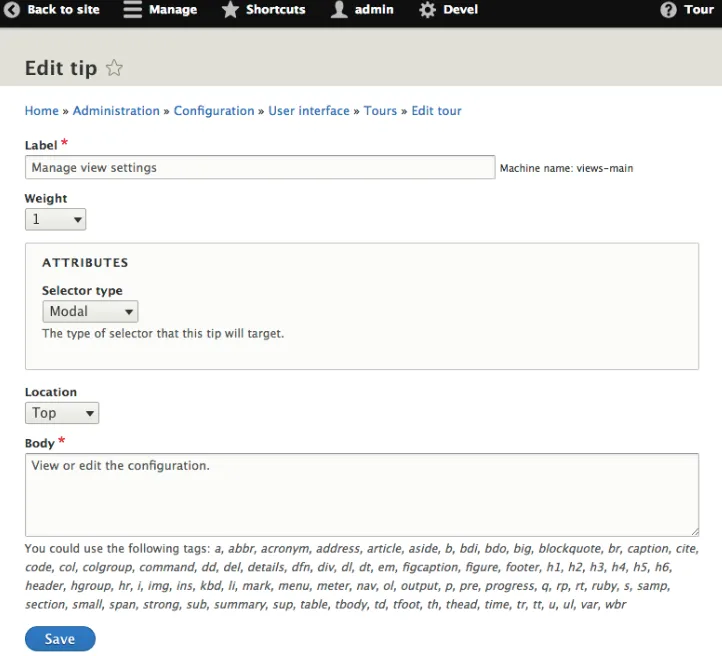
Once those elements are defined, we can add each individual tip of the tour by adding a new ‘Text’ element in the menu. On that menu, we fill in the fields which we might already understand since we looked at the YAML directly first earlier in this post.
Image
Image
Once we have saved our Tour, it is ready to use. Again, ensure that users have access to the tours, but there is no additional needed step to import or configure our site to use the tour. The module has taken care of this step for us.
If there is a downside of the Tour UI module, it is that it is still in Beta as of the time of this post. This, in part, means you can not use it for Composer builds that require Stable versions. It also means they need your help. If you think that Tour UI is a better approach, let the team know and help get this awesome module to Stable!
Go Forth and Explain Your Modules!
While maybe not the most renowned capability of Drupal or the bit of code that gets discussed the most, I believe Tour is an important part of Drupal 8 and beyond as we focus more and more on the user experience with tools like the Layout Builder or Umami. Thinking on how we can change the conversation from ‘read the docs’ to ‘click the button in the upper right-hand corner’ makes me excited for the future of the project.
Again I encourage you to spin up a new site to test all this out on Pantheon or maybe use our Build Tools. If you get stuck and would like some help with build tools, always feel free to come to Pantheon’s Office hours, every Wednesday at 11:00 am PDT.