Automate Phar Releases on GitHub with TravisCI
For PHP projects that produce an executable application, the Phar format is a very convenient way to bundle everything in the project together into a single easy-to-use binary file. This file can even be attached to GitHub releases, where they may be downloaded with a single click. If you want to jump right in and create a new project that automatically uploads a Phar to GitHub on every release, the g1a/starter project will set that and a whole lot more up for you in just a few minutes. This blog post explains how the Phar upload process works.
The following topics will be covered:
- Creating a PHP application.
- Creating a Phar version of that application.
- Automating the Phar build in Travis in every deploy job.
- Uploading the Phar to GitHub after it is built in Travis.
- Automating the release process with a Composer script to tag and manage versions.
- Allowing end users to update to the latest release via a self:update command.
Feel free to skip ahead a few sections if you have already accomplished some of these steps.
Create a PHP Application
The easiest way to do this is to use Robo as a Framework. Robo is a PHP task runner, but it also contains classes to make it quick and easy to build standalone applications of any type. The main entrypoint for a Robo-based application looks something like this:
require __DIR__.'/vendor/autoload.php';
$runner = new \Robo\Runner(['\Org\ExampleCommands']);
$out = new \Symfony\Component\Console\Output\ConsoleOutput();
$status = $runner->execute($_SERVER['argv'], 'name', '1.0.0', $out);
exit($status);
The lines above perform the following functions:
- Include the Composer autoloader, which makes all of our classes available.
- Instantiate a new Runner object, providing it with a list of classes with commands.
- Create a Console output object.
- Tell Robo to handle all of the details, providing it with the command line arguments, the name and version of the application (for help et. al.), and the output object.
- Make sure that the final status code is returned to the caller.
That will get you the basics of a simple application that you can call from the command line. Compare this with the more full-featured example in the starter project for a hint of what else can be done with the Robo framework.
Once you have your application set up, you can define new commands with plain php code:
namespace Org;
class ExampleCommands extends \Robo\Tasks
{
/**
* @command hello
*/
public function hello($who = 'World')
{
$this->io()->text("Hello, $who");
}
}
The annotation-based command classes are based on the symfony/console project; if you prefer, you may use symfony/console directly to create your application with only a little bit more code.
Create a Phar Version of Application
Prior to uploading the Phar, it is necessary to build it. A good way to do this is with the box command. To set it up, all that you need to do is set up a box.json file and customize its contents to specify which files from your project should be comprised from. The example below shows a partial box.json that defines the name of the output Phar and which portions of the project should be included in the final result.
{
"output": "awesome-example.phar",
"main": "example",
"directories": ["src"],
"files": ["example", "README.md", "VERSION"],
...
}
Actually building the Phar can be accomplished by running box build.
Automate the Phar Build in Travis
This can be done in a before_deploy step in your .travis.yml file. Before building the Phar, it is helpful to run composer install again with the --prefer-dist and --no-dev options to remove unnecessary dev components.
before_deploy:
- composer install --prefer-dist --no-dev --no-interaction
- php box.phar build
Upload Phar to GitHub from Travis
Once you have a Phar, you can easily attach it to a release from the edit release page. There is a place near the bottom of the form to upload new files:
Image
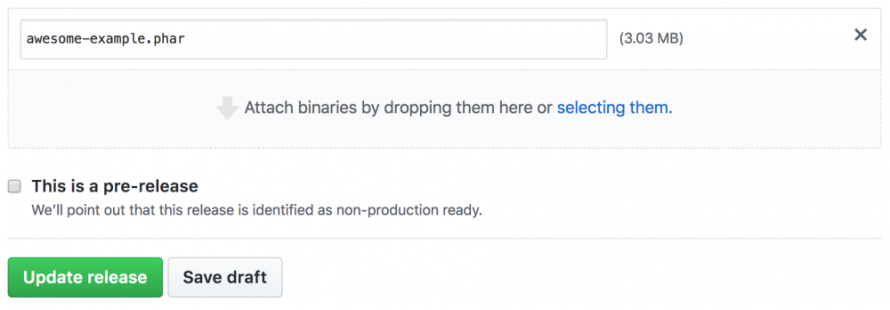
Uploading a binary file to GitHub may be easy; however, rolling out a release requires a number of different steps, all of which are easy enough to do, but tedious to do over and over again. To keep our sanity, and to reduce the chance that human error could result in a bad release, we’ll automate these steps. We will use a feature of the TravisCI command line tool to set up a release step for us. You’ll first need to download the Travis tool if you do not already have it. (Read to the end of the installation section for the platform-specific download methods; these are often easier.)
Change your working directory to a local working copy of your project and run the travis setup releases command. Answer the prompts as shown below:
$ travis setup releases
Username: greg-1-anderson
Password for greg-1-anderson: *************
File to Upload: awesome-example.phar
Deploy only from g1a/awesome-example? |yes|
Encrypt API key? |yes|
Once you answer the questions that you are prompted for, the Travis tool will add release directives to your .travis.yml file. Open this file up and make the following changes to it:
deploy:
provider: releases
api_key:
secure: KmKwmt...[REDACTED]...LPE=
file: awesome-example.phar
skip_cleanup: true
on:
tags: true
repo: my-org/awesome-example
Without the skip_cleanup: true directive, Travis CI would delete the build results before processing the upload. The tags: true directive causes the deploy to happen only after tag builds. The Travis setup releases command does not include these, so it is necessary to add them in after it is done.
Automate the Release Process
The g1a/starter project has a simple release script that makes it easy to push out new versions of your projects. It looks similar to the following:
# Remove '-dev' from the version file to prepare for release.
sed -e 's/-dev$//' VERSION > VERSION.tmp
mv -f VERSION.tmp VERSION
# Tag a release
ver="$(cat VERSION)"
git add VERSION
git commit -m "Version $ver"
git tag "$ver"
git push origin "$ver"
# Advance to the next patch release, add the '-dev' suffix
# back on, and commit the result.
a=( ${ver//./ } ) && ((a[2]++))
echo "${a[0]}.${a[1]}.${a[2]}-dev" > VERSION
git add VERSION
git commit -m "Back to -dev"
git push origin master
Pushing the new semver tag up to GitHub will cause the deploy step described above to run in TravisCI, which will result in the automation we set up above to build our Phar and upload it to the new release on GitHub.
If you define the above as a Composer script, then you will be able to make new releases simply by running composer release.
Provide a self:update Command
Now that you can easily make releases for your project with almost no effort, you’ll probably want to make it easy for your end users to get these updates. Rather than requiring them to visit the GitHub releases page and download the latest Phar, you could provide a self:update command to do this automatically. If you are using the Robo framework, all that you need to do is provide the full name of the project on GitHub to the runner, and the self:update command will be added for you.
$runner->setSelfUpdateRepository('my-org/awesome-example');
If your application uses the Symfony Console APIs directly, you may use the consolidation/self-update project; it works on its own with any Symfony Console application.
Putting It All Together
If you would like some real-world examples, take a look at the following projects which use the techniques from this blog:
- https://github.com/pantheon-systems/updatinate
- https://github.com/g1a/hubph
- https://github.com/consolidation/site-alias
- https://github.com/consolidation/filter-via-dot-access-data
Decking out your application with automated releases and updates isn’t very much work when you follow the instructions in this blog. If you want to do it even faster, though, the previously mentioned g1a/starter project will do all of these steps and more. Take a look at it, try it out, and start saving time.